Wednesday, April 28, 2010

Recipe of the Week....Meatball Bake

It's Wednesday, so that means that we're half-way to the weekend - yippee! This week's recipe of the week is Meatball Bake...it's SO SIMPLE to make and only uses 4 ingredients! This dish feeds 4 - 6 people, but can easily be doubled or tripled if you need to feed a crowd quickly and inexpensively. It's another favorite with my family and friends, so I hope you enjoy it as well!


Ingredients:
  • 16 jumbo pasta shells
  • 16 meatballs (you can make them from scratch, but I like to use the frozen ones to save time!)
  • 1 jar spaghetti sauce
  • 2 cups shredded Italian blend cheese
Method:

Cook pasta shells until they are still a little firm. Spray an 8" x 8" baking dish with non-stick cooking spray. Place a meatball in each of the pasta shells and place in baking dish. Pour the jar of spaghetti sauce over the pasta & meatballs. Sprinkle the cheese on top. Cover dish with foil and bake at 350 degrees for about 30 minutes, removing the foil for the last 5 minutes of cooking time. Serve with a salad and garlic bread - soooo good!

Have a GREAT day!

Photobucket

Saturday, April 24, 2010

Altered Wooden Letter Wall Hanging Tutorial

Happy Saturday! Not much going on around the Brown house today...Mike's working out in the garage and I've been cleaning, doing laundry and working on a few projects. Shown below is a project that I worked on last weekend...it's a wall hanging made out of a wooden letter "R" that I picked up at Hobby Lobby. I made it for my friend, Rachel, whose birthday was yesterday.


Here's a list of the materials that I used as well as a quick tutorial on how I made it: 

CTMH Materials:
  • Bella Floral Paper
  • "With Love" stamp set
  • "A Tweet" stamp set
  • "Playful Flourishes" stamp set
  • "From Me to You" stamp set
  • Liquid Glass & Two-Way glue
  • Sponge
  • Sparkles
  • Ink Colors: Chocolate, Topiary, Pansy Purple, Hollyhock, Desert Sand, Creme' Brulee', Sorbet
  • Blending Pen
  • 3-D Dots
  • Sanding Block
  • Colonial White Cardstock
  • Bronze Bitty Brad
  • Paper Piercing tool
  • Cocoa Ribbon
Non CTMH Materials:
  • Wooden letter
  • Sponge brush
  • Acrylic paint
  • Purple, dome-shaped button
  • Paper towels
  • Purple brads
Begin by painting the outside edges of your wooden letter with a sponge brush and acrylic paint of your choice. Once painted, set aside to dry.


While the paint is drying, stamp the images of your choice, color in with a Blending Pen, and then add additional detail by sponging ink on the stamped designs if desired.


Cut out stamped images and set aside. When painted edges on the wooden letter are dry, place it right side down on the back side of a piece of B&T paper. Trace around the letter and cut out the traced image.


Once the image has been cut out, thoroughly cover the front of the wooden letter with Two-Way glue making sure that you go completely to the edges of the letter with the glue to ensure good adherance.


Starting at the bottom of the letter, carefully attach the cut out paper letter to the wooden letter, smoothing out any air bubbles as you go.


At this point your letter doesn't look like much...but here's where the fun begins! Once the glue has completely dried, (while you wait for the glue to dry, eat a bowl of ice cream and browse through the new CTMH Idea Book!!), use a sanding block and sand the edges of the letter to remove any paper that may hang over the edge. Then use Chocolate ink and distress the edges of the letter by gently rubbing the ink pad along the edges. (If you prefer, you can also sponge ink around the edges). Set the letter aside and take your cut out flower images to the kitchen sink. Place several layers of paper towels on the kitchen counter. Crumple up each flower and put it under running water...this softens the paper and makes the ink run, creating a unique watercolor-sort of effect. Carefully un-crumple the flowers, shape them how you like and place on the paper towels to dry overnight. They don't look like much right now...but just wait.....


Once the flowers have dried, use a sponge and dapple ink over them to add a little more dimension. Now begin layering and shaping your flowers as desired, attaching them and any other stamped images you've created to the wooden letter with 3-D dots to add additional dimension. Add a bronze bitty brad for the bird's eye. Add sparkles to "vines/stems" if desired.


Here's a close-up view of the flowers, etc.:

Cut Cocoa grosgrain ribbon to desired length. Tie ends to the top of each side of the letter to form a hanging loop. Hang on a wall or door and enjoy!


Have a fun and safe weekend!

Photobucket

Tuesday, April 20, 2010

Recipe of the Week...Baked Goulash

Here's a really delicious and filling casserole for the "Recipe of the Week".  Baked Goulash is a favorite with my family and can be prepared a couple of days in advance and refrigerated until you're ready to pop it in the oven!


Ingredients:
  • 1 box Velveeta Shells and Cheese
  • 1 lb. lean hamburger meat
  • 1 small onion, chopped
  • 1 cup diced, green pepper - optional
  • 2 cups shredded cheese
  • 12 oz. tomato sauce*
  • 1 Tablespoon dried basil
  • 1 Tablespoon dried oregano
  • 1 Tablespoon dried parsley
  • 1 teaspoon garlic powder
  • Salt and pepper to taste
Method:
Grease a 9" x 13" baking dish. Prepare shells and cheese according to package directions, being careful to not over-cook pasta. While pasta is cooking, brown hamburger meat with chopped onion and, if desired, diced green pepper. When meat is cooked through, drain and rinse to remove fat. Add meat to prepared shells and cheese. Add tomato sauce, dried herbs, garlic powder, salt and pepper to taste. Pour mixture into greased baking dish. Cover with shredded cheese of your choice...sometimes I use colby-jack and sometimes I use mozarella or an Italian blend cheese. Bake at 350 degrees for 30 minutes. Serve with a salad or other veggie and hot rolls - DELICIOUS!

*NOTE: 12 oz. of your favorite spaghetti sauce can be used in place of the tomato sauce, if desired.

Have a blessed day!
Photobucket

Saturday, April 17, 2010

CTMH Miracle Kit Details

The BEAUTIFIL Miracle Kit from CTMH is now available...but only from April 15th - May 31st.  Here are the pricing details:
  • Purchase the kit outright for $19.95
  • With a $40.00 catalog order you may purchase the kit for only $10.00
  • With a $60.00 catalog order you may purchase the kit for only $5.00
Check out my post from March 28th to view the Miracle Kit scrapbook pages I created, as well as the other items I made with the kit "left-overs". Don't miss out...email me today to order yours!


Photobucket

Thursday, April 15, 2010

Recipe of the Week..."Real Deal" Cherry Pie

This week's recipe of the week is for a scrumptious cherry pie...with REAL cherries, not cherry pie filling! YUMMY!! I'm also including a great pie crust recipe...but you can "cheat" and purchase a Pillsbury pie crust if you'd like.  I actually like to use Jiffy pie crust mix for my pie crusts...it makes delicious pie crusts, it's simple and quick to use, and it's inexpensive too!


Pie Crust Ingredients:
  • 2 2/3 cups all-purpose flour
  • 1 cup Crisco vegetable shortening
  • 1 teaspoon salt
  • 6 tablespoons of ice water
Cherry Filling Instructions:
  • 1 1/3 cup white sugar
  • 1/2 cup all-purpose flour
  • 3 (16 oz.) cans of pitted, red tart cherries, drained (or 6 cups frozen, unsweetened, pitted red tart cherries can be used instead)
  • 1/4 teaspoon almond extract
  • 2 Tablespoons butter
Instructions:

Preheat oven to 425 degrees. Mix flour and salt in a mixing bowl. Cut shortening into the flour with a pastry cutter or fork until mixture resembles small peas. Add ice water, one tablespoon at a time, and mix in using a fork. (More or less water may be needed, depending on how dry the air is...just don't add much more than an extra teaspoon or you'll end up with a goopy mess!) Gather dough into a ball. Divide dough into two balls and flatten each into a 4-inch wide disk. Roll dough disk on a lightly floured surface into a 12-inch circle and place into an ungreased 9-inch regular or deep dish pie plate. Gently press dough into pie plate, leaving the portion that overhangs the edge of the pie plate in place. NOTE: Don't handle pie crust too much, or it becomes tough...a light, flaky crust is the goal!

For cherry pie filling, combine sugar and flour in a large mixing bowl. Stir in drained cherries and almond extract. Pour into the prepared pie crust and dot the top with the butter.

Roll out the remaining disk of dough and place over filling.  Or, after you roll out the dough, using a cookie cutter you can cut shapes out and layer over the filling to create a decorative crust. As shown in the photo above, I used a heart shaped cookie cutter and layered the hearts to form my top crust. Roll the edges of the bottom crust to form a decorative edge. Sprinkle the top crust with a teaspoon of sugar.

Bake on center rack in oven for 15 minutes. Reduce oven heat to 375 degrees, cover edges with foil so they don't over brown, and bake pie for an additional 35 minutes or until top is a nice, golden brown.

Serve with vanilla ice cream and ENJOY!!

Photobucket

Wednesday, April 14, 2010

6" x 6" Accordion Album Tutorial

Hi! I'm home from work today with a little stomach bug, (YUCK!), so thought I'd take a minute to post a tutorial on a 6" x 6" accordion album that I created shortly after I became a CTMH consultant a couple of years ago. (The cover of the album is based on a card that I saw in the Spring 2008 Idea Book, which was my "spring board" idea for whole the album). I used paper from the Silhouette pack and the "Joy Forever" stamp set from CTMH, but you could adapt the design to your pictures using any of CTMH's paper or stamps. (I intend to use this one for old black and white photos of my grandparents from the 1940's).


Here's a supply list of what I used:

CTMH Products:
  • 6"x6" accordion album
  • Joy Forever stamp set
  • Silhouette Level I paper pack
  • Colonial White grosgrain ribbon
  • Black and white gingham ribbon
  • Hemp
  • Gold brads
  • Black and Chocolate ink
  • Black and Chocolate distressing inks
  • Paper distressor
  • 3-D dimensional dots
Non-CTMH Products:
  • Jute
  • Button
  • 1 1/8" wide brown grosgrain ribbon
  • 1/2" circle punch
  • 1/4" circle punch
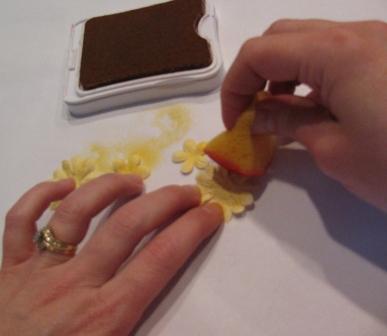
Photo and instructions for cover:

Distress edges of the front and back of the album with chocolate ink. Random stamp small flower pattern on the front and back with black ink. Cut a piece of striped paper 4" x 4" and a piece of Bamboo cardstock 3 3/4" x 3 3/4". Adhere bamboo cardstock to center of striped paper. Cut a piece of Colonial White cardstock 3" x 1 1/4", stamp sentiment in the center, distress edges with Chocolate ink, and adhere to the lower left hand corner of the Bamboo cardstock. Stamp 3 flowers onto Daisy White cardstock using black ink and cut out. Using the Chocolate distressing ink, lightly sweep the ink pad across the tops of the flowers to give them a "brush-stroked" appearance. Using a 1/2" circle punch, punch out 3 circles from the polka-dot paper and adhere to centers of flowers. Cut a 4 1/2" piece of Colonial White grosgrain ribbon and a 2 " piece of natural colored hemp. Tie the hemp about an inch from the left side of the Colonial White grosgrain ribbon, and adhere the ribbon approximately 1" from the top of the striped paper that has been layered with the Bamboo cardstock. Adhere striped/Bamboo block to center of album. Using 3-D dimensional dots, adhere flowers as shown in photo above. Stamp 2 leaves on the backside of the polka-dot paper, cut out, and adhere as shown.
Photo and instructions for pages 1 and 2:


For page 1 cut a piece of the bamboo/black floral paper 4" x 6" and adhere to the top of page. Cut a piece of striped paper 3" x 6", place adhesive on the bottom and two sides only, and adhere under the bamboo/black floral paper to form a pocket. (Striped paper will slightly overlap floral paper). To create the pocket trim strip, random stamp brown flowers on 1/2" x 6" piece of Daisy White cardstock, distress the edges with black ink, and adhere to upper edge of black striped paper.  To create tags, cut two pieces of Colonial White cardstock 3" x 4 1/2", angle or round edges if desired, and distress edges with brown ink. Punch two 1/2" circles from the polka-dot paper, and adhere to the center of the top edge, leaving approximately 1/2" head space at the top, to create decorative hole re-inforcers. Punch a 1/4" hole in the center of each of the 1/2" circles, and tie a piece of Colonial White grosgrain ribbon through the holes as shown in the picture. Slide tags into pocket. Tags can be used for journaling or for additional photos.

For page 2 cut a piece of polka-dot paper 6" x 6" and adhere to second page of album. Cut a piece of Daisy White cardstock 4 1/2" x 4 1/2" and distress edges with brown ink. Cut black and white gingham ribbon into two 2 1/2" pieces. Wrap around corners of Daisy White cardstock, adhering only on the back so that a photo can be slid under the ribbon corners. Adhere ribbon-trimmed cardstock to center of polka-dot paper.

Photo and instructions for pages 3 and 4:


For page 3 cut bamboo/ivory floral paper 6" x 6" and adhere to album page. Cut to pieces of black floral paper 3" x 3" and adhere to center of bamboo/ivory floral paper, angling and overlapping corners as needed to fit onto page. Stamp large flower onto Daisy White cardstock using Chocolate ink. Using black ink, stamp floral outline onto Chocolate brown flower and cut out. Attach button to center of flower. Using glue dot, attach a piece of knotted jute to center of flower and then attach flower with a 3-D dot to upper right corner of page. Cut two 3" pieces of Colonial White grosgrain ribbon. Fold one piece in half and attach under flower petal as shown in photo. Tie the other piece of ribbon into a knot and attach to the lower left hand corner of page as shown in photo.

For page 4 cut a piece of striped paper 6" x 6", distress edges with black ink, and adhere to album page. Cut a piece of Bamboo cardstock 4 1/2" x 4 1/2" and adhere to center of a piece of 4 3/4" x 4 3/4" black cardstock. Adhere at an angle to striped paper as shown in photo. Tie a piece of 3/4" wide brown grosgrain ribbon, cut to 3 1/2" in length, into a knot. Trim ends and adhere to lower right corner of page.

Photo and instructions for pages 5 and 6:


For page 5 cut a piece of black floral paper 6" x 6" and adhere to album page. Cut a piece of Daisy White cardstock 3 3/4" x 3 3/4" and random stamp with brown and black flowers. Cut a piece of Bamboo cardstock to 3" x 3" and adhere to center of random stamped White Daisy cardstock. Cut two pieces of 3/4" brown grosgrain ribbon to 3" in length. Attach to two corners of the White Daisy random stamped cardstock. Using a paper piercing tool, punch "starter holes" into the ribbon and attach gold brads as shown in photo. Adhere diagonally to page as shown in photo.

For page 6 cut a piece of Bamboo floral paper 6" x 6" and adhere to album page. Cut a piece of black cardstock 6" x 4". Tear the bottom of the cardstock so that length will end up being approximately 5 1/4" to 5 1/2". Distress edges of black cardstock with paper distressor or edge scissors. Cut a piece of Colonial White cardstock to 3 1/4" x 4", distress edges with paper distressor and then ink edges with Chocolate brown ink. Cut a piece of Colonial White grosgrain ribbon approximately 12" long. Wrap ribbon around lower half of black cardstock, securing in the back with a glue dot, and tie in a knot on the front as shown in the photo. Trim edges of ribbon. Adhere to center of page as shown in photo.

Add pictures and you've got a great little memory book for yourself or to give as a gift! I'd love to see your versions of this little book, so feel free to email photos of your projects to me!

Well, my tummy is rumbling, so I think I'll eat a piece of toast! Take care and have a blessed day!

Photobucket
P.S. What do you think about my new blog signature??

Sunday, April 11, 2010

My little sis is turning 40 tomorrow!

My little sister turns 40 tomorrow, April 12th, so if you happen to read this, HAPPY BIRTHDAY SARAH!!  Here's a blast from the past...a photo of Sarah and me circa 1973:


Sarah's on the left and I'm on the right.  Our mom, who is an excellent seamstress, used to always make us matching dresses, which is so funny to look back on now because our personalities have always been so very different! I wanted to make a special card to commemorate Sarah's 40th birthday, so here's what I came up with:


I hope that Sarah enjoys her 40's as much as I am!  I have found it to be quite liberating....it's nice to know who you are and to be comfortable in your own skin!!  I recently read an article in a magazine about a Japanese term called "Wabi Sabi".  It talked about finding the perfect in the imperfect of every day, such as a handmade bowl which reflects craftsmanship in its imperfections rather than a machine-made bowl which is perfect but has "no soul".  It spoke of how people should accept the "Wabi Sabi" in themselves as well as in others, and used this poem by Leonard Cohen as analogy:

Ring the bells that still can ring,
Forget your perfect offering,
There's a crack in everything,
That's how the light gets in.

So here's to being in our 40's, (or whatever age you may be!), accepting ourselves and each other for who and what we are, and just being happy!  Have a blessed week!

Becky

Wednesday, April 7, 2010

Decorative Dry Erase Board Tutorial


Hi! In February I held a workshop on how to create decorative and functional dry erase boards from 11" x 14" picture frames. The workshop was a hit, and the dry erase boards turned out SO CUTE! The products shown in these instructions are from CTMH, but I've made several other dry erase boards for gifts using other papers and products. Here are the instructions on how you can create one of your own:


Cut a piece of 12" x 12" patterned paper to 11" x 12".  (I used the double-sided polka dot paper from the CTMH "Jingle" paper collection). Cut another piece of patterned paper to 2" x 11". Remove the glass and chipboard/cardboard insert from the frame, adhere papers as shown in the photo below to the chipboard/cardboard insert that was removed from the frame, overlapping the 2" strip to the 11" piece of paper so that the insert is completely covered. Set aside.
Cut a piece of Colonial White cardstock to 10" x 3 3/4" and a piece of patterned paper to 9 1/2" x 3 1/2". (I used striped paper from the CTMH "That's Amore" paper collection). Adhere striped paper to cardstock and set aside.


Cut a piece of Colonial White cardstock to 6" x 4 1/2" and a piece of patterned paper to 5 1/2" x 4". Adhere patterned paper to cardstock and set aside. Cut a piece of Blush cardstock to 4" x 3 1/2", and using a paper piercing tool, poke holes in 3 of the 4 corners. Attach black brads in these 3 holes and set aside.


On a scrap piece of cardstock, stamp desired images. (I used images from the CTMH December 2009 Stamp of the Month "Notice the Details"). Cut out images and set aside.


Sponge ink color of your choice onto CTMH White Daisy flowers, attach red brads through the centers, and set aside.


Cut a piece of black grosgrain ribbon 11" long, apply adhesive and adhere to chipboard/cardboard frame insert that you've decorated with patterned paper.

Create a tab from Blush cardstock, (I used the tab punch from McGill), and stamp "Remember" on the tab. Attach tab to the top of the long cardstock/patterned piece. Using a paper-piercing tool, punch holes in either side of the tab, through all the layers, and attach black brads.  Add this piece to the right side of the patterned paper you've adhered to the chipboard/cardboard frame insert as shown in photo below.


Add other stamped elements to cardstock pieces as shown, and adhere to chipboard/cardboard frame insert:


Attach flowers with Glue Dots:


Re-assemble frame by placing decorative base on the glass front, face down. Your dry erase board is now ready to display on an easel or hang up on a wall.  Use a standard dry erase marker, (not a permanent marker!), to make notes on your dry erase board. Clean with a baby wipe or a paper towel sprayed with Windex. Here's another look at the finished product:


I hope this little tutorial has been helpful...I would LOVE to see your dry erase board creations as well!  Feel free to email photos of your creations to me as well as any comments or ideas that you may have!

Have a blessed day!

Becky 

Monday, April 5, 2010

Recipe of the Week....Kari's Favorite Low-Fat Pimento Cheese Spread


Tomorrow is my niece Kari's birthday so in honor of her, this week's recipe of the week is one of her favorites: Low-Fat Pimento Cheese Spread.  Whenever we have a family get-together, Kari always likes for me to make this for her, and I'm always happy to oblige!  (Kari is in the photo to the left...isn't she so cute??)  Here's the recipe:


Low-Fat Pimento Cheese Spread

Ingredients:
  • 2 - 8 oz. packages of low fat cream cheese  (Don't use fat-free...it doesn't "whip up" fluffy and goes flat).
  • 1/2 cup Miracle Whip Light
  • 1 - 4 oz. jar diced pimentoes, drained
Method:

In a medium bowl with mixer on high speed beat softened cream cheese and Miracle Whip Light until smooth. Add drained pimentoes and beat until blended. Cover and chill several hours. Spread on crackers, celery, party bread, etc.  YUMMY!!

Enjoy!!

Becky


Sunday, April 4, 2010

A "Berry" Happy Easter...

I hope that you had a Happy Easter! After Bible study this morning, Mike and I spent the afternoon working in the yard and our little garden spot. We power-washed the back porch, which was covered with little muddy footprints from our beagle, Hunter. We planted 2 flats of begonias, 4 varieties of tomato plants, green beans, and a few strawberry plants. The strawberry plants already had some berries on them and 3 of the berries had already ripened. Just for fun I took a photo of these 3 little berries...aren't they pretty??


I'm excited for more berries to ripen so that I can make strawberry jam. I've always had to buy strawberries each year to make jam, which can be a little costly, so I hope that my own strawberry plants are successful so that I can get at least one batch of jam out of them this year!

Wishing you a GREAT week!

Becky