Thursday, November 11, 2010

Recipe of the Week..."Cheeseburger & Fries Casserole"

As I stated in yesterday's post, one of the things that I do each Sunday afternoon is prepare all of our meals for the upcoming week. This is a MAJOR time saver for me, since I work full time! It also saves money, because I'm not tempted to go through a drive-through on the way home since I've already got dinner ready to pop in the oven! The photo below shows how I label the dishes I prepare each Sunday. I use a Sharpie and write the following information on the foil cover:
  • What's in the dish
  • The date it's to be prepared
  • The oven temperature and length of time it takes to cook
If Mike gets home from work before me, he has all of the information in front of him so he can pop it into the oven and we can get dinner on the table quicker!

The next photo is of the Cheesburger and Fries Casserole, that I served for dinner Tuesday evening, and it's this week's recipe of the week:


Ingredients:
  • 1 lb. lean ground hamburger meat
  • 1 package dry onion soup mix
  • 1/2 teaspoon garlic powder
  • American cheese slices
  • Half of a 32 oz. bag frozen french fries
  • Cream of mushroom soup
  • 1/2 cup milk
  • Salt and pepper to taste
Method:
In a large mixing bowl, combine hamburger meat, dry onion soup mix, garlic powder, salt and pepper. Mix thoroughly. Press meat mixture into a greased 8" or 9" baking dish. Place cheese slices on top of meat mixture. Add frozen french fries on top of the cheese. Whisk together soup and milk and pour over french fries. Cover with foil and bake at 350 degrees for 30 to 45 minutes. Serve with a salad and enjoy!

This is a very, very quick and easy meal to prepare, and kids LOVE it!
Have a great day!
Photobucket

Wednesday, November 10, 2010

Blogger Award

My blogging friend, Stacie, (aka the Craft-Princess), has nominated me for the following Blog Award, which comes with a fun $5.00 gift certificate to Digi's With Attitude! Thanks, Stacie...you've made my day!!


The rules for accepting this award and gift certificate are:
  • I must post the award and the link to the Digi's With Attitude site in my sidebar - done!
  • I must tell you 3 things about me that makes me different from everyone else:
    • I sort/organize the clothes in my closet by color.
    • I prepare all of our meals for the upcoming week on Sunday afternoons (peeling, chopping, pre-cooking meat, making casseroles, etc.)
    • I have a standing lunch date with my dear hubby every Wednesday! My co-workers tease us and have nicknamed our date day "Wife Wednesday".
  • I must nominate 5 other blogs for this award, which is a toughie since I enjoy reading several blogs! I decided to nominate blogs that I haven't previously nominated for an award...so here are my 5 picks, in no specific order:
I hope you'll take a minute to check out these AWESOME blogs as well...I'm sure you'll come away with some FANTASTIC ideas just like I do when I visit their blogs!

Have a blessed day!
Photobucket

Tuesday, November 9, 2010

Scrapbook Page of the Week..."Happy Thanksgiving"

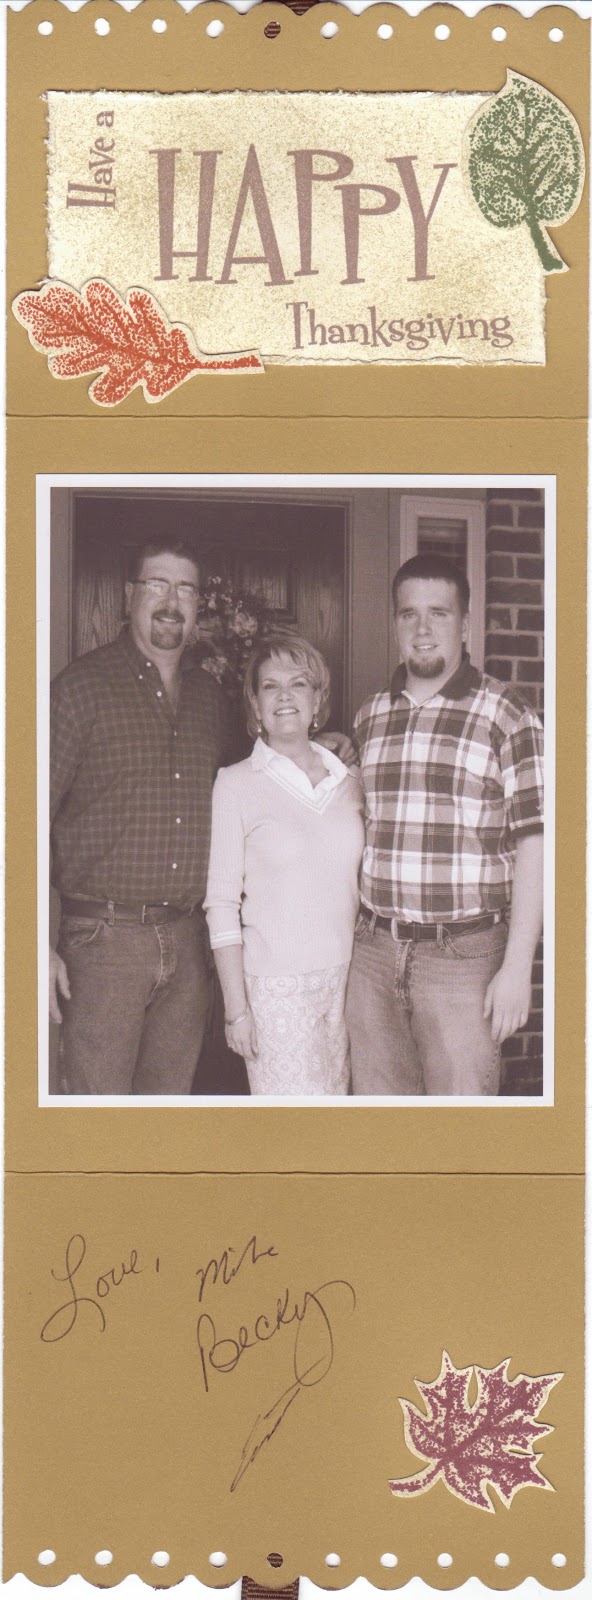
This week over at Glitterbabe's the challenge is to create a Thanksgiving project using some sparkle, so I created this layout which highlights our Thanksgiving photo card. (I created the card online at Snapfish.com).


The sentiment on the card says:

Happy Thanksgiving
Wishing grace and peace to you from God our Father and the Lord Jesus Christ! ~ Philippians 1:2 ~
Mike, Becky and Justin Brown

I random stamped the background cardstock using a retired CTMH stamp set called "Summer's Wave". I used Autumn Terra Cotta, Barn Red, New England Ivy and Chocolate CTMH ink to stamp the leaves. I lightly sponged Sunflower yellow ink over the entirety of the cardstock to add a little depth. The photo card is matted on Buttercup yellow and New England Ivy CTMH cardstock. I distressed the edges of the yellow cardstock and tore the bottom of the ivy cardstock, rolling the edges to add some dimension. Using glue dots, I adhered a coordinating piece of satin ribbon to the green cardstock, adding a buckle and sparkly button dots. To the left of the photo I adhered three colors of coordinating ribbon to the background cardstock, tying knots in each piece of the ribbon and staggering the placement of the knots. I then added sparkly bling leaves to the lower portion of those ribbons.

Hope you're having a wonderful week!

Happy Scrappin'!
Photobucket

Monday, November 8, 2010

Thanksgiving Card Tutorial

November has finally arrived which means that my favorite holiday, Thanksgiving, is right around the corner! Thanksgiving is my favorite holiday because it's uncommercialized and a calm day to reflect on the many, many blessings that the Lord has showered me with over the past year. I love spending the day before Thanksgiving in my kitchen, listening to classical music and whipping up heirloom recipes that have been passed down to me from my dear grandmothers. It means the world to me to spend Thanksgiving day fellowshipping with my family and enjoying lots and lots of yummy food...we are fortunate to have a family of AMAZING cooks! To celebrate my favorite holiday, I thought I'd share a random stamped Thanksgiving card that I created using the discontinued CTMH stamp set, "Summer's Wave".


Start out by cutting a piece of Desert Sand cardstock 4 1/4" wide x 12 long". Score at 3 1/4" and 8 3/4" on the 12" side of the cardstock. Using a scalloped border punch, punch design out of each end of the card. Random stamp the flaps of card and then sponge ink around the edges and on the flaps of the card to give an aged look to it. Using a Glue-Dot, attach a 16" long piece of 3/16" wide chocolate grosgrain ribbon to the center of the back of the card, (the tails of the ribbon hang over the ends...my scanner wasn't long enough to capture the entire length of the ribbon), as shown in photo:


Stamp Thanksgiving sentiment on a piece of 3 1/2" long x 2" wide piece of Colonial White cardstock. (I used the CTMH "A Little Everything" for the sentiment). Distress the edges and sponge with Desert Sand ink. Attach to the inside top flap of card. Stamp various leaves in fall colors, (I used Terra Cotta, Barn Red, and New England Ivy inks), and cut out. Attach to inside of card, along with a family photo, as shown in photo below:


Sign your card, fold on score lines and tie closed with ribbon and your card is ready to be mailed in a standard A2-sized envelope.

Happy Scrappin'!
Photobucket

Friday, November 5, 2010

Scrapbook Page of the Week..."A Mother's Love"

Happy Friday! It's been a very loooong and stressful week at work. Needless to say, I'm thankful that this week is finally behind me and I'm really looking forward to some down time at home this weekend to clear my head!

Now on to funner things!! I want to share a scrapbook page that I created a while back, which highlights a photo that I had enlarged. Mike took the photo of Justin and me on Justin's 2nd birthday back in 1991. It's one of my favorites, so I had to make a special scrapbook page with it. The story behind the photo is that we were in our backyard and Justin was really tired from all of the birthday celebration hoopla, so I picked him up and was getting ready to take him inside and put him down for a nap when Mike snapped the photo. He was so little and sweet, and just wanted his mama to hold him....oh those were the days!!


You'll notice that in the lower left corner of the layout I've added a metal frame that houses a photo of Justin and me in 2003, which is when I created this scrapbook page.  Here's a close-up photo of that detail...sorry that there's a little bit of a glare:


There's a challenge going on over at Frosted Designs to use a large photo on a 12" x 12" scrapbook page, so I decided to enter this layout in the challenge, since it's one of my favorites! Be sure to check out the other entries HERE.

Have a safe and relaxing weekend! Here's to a better week ahead!!!

Photobucket

Wednesday, November 3, 2010

Recipe of the Week...Rum Flavored Bread Pudding

This bread pudding recipe is a wonderful way to use up day-old bread or croissants! It can be served either warm or cold and is a great with a glass of milk or a cup of coffee.

INGREDIENTS:
  • 1 stick of butter or margarine
  • 1 cup sugar
  • 2 cups milk, heated
  • 3 eggs, beaten
  • 2 teaspoon vanilla extract
  • 1 1/2 teaspoons rum extract
  • 1 teaspoon ground nutmeg
  • 1 teaspoon ground cinnamon
  • 6 or 7 small croissants, (or about 8 slices of bread), cubed
  • 1 cup chopped pecans
  • raisins, if desired (Mike doesn't like raisins, so I leave them out)
METHOD:
Cream butter and sugar. Add beaten eggs, warm milk, vanilla extract, rum extract, nutmeg, cinnamon and mix well. Place the cubed bread into a buttered 2 quart baking dish. Pour the liquid mixture over the bread and push the bread into the liquid so it's evenly coated. Sprinkle nuts, (and raisins if desired), on top. Bake in a 350 degree oven for 55 minutes to 1 hour. Can be served warm or cold. Refrigerate any leftovers. ENJOY!
Photobucket

Sunday, October 31, 2010

Digi-Design Card Challenge

Well, it's Sunday evening and I'm gearing up for another work week. I was fortunate enough to take a couple of vacation days last Thursday & Friday, so I've enjoyed a 4-day weekend!

I decided to try my hand at using a digi-design to create a card this afternoon. I discovered on my blogger friend, Stacie's site,  that there's a challenge going on over at Glitterbabe's, so I downloaded some of their free digi-art to give it a try.  I printed 3 flowers and sponged ink over each of the images. I then cut the flowers out, adding bling to the top flower, and then layered the flowers using 3-D dots to add extra dimension. The leaves are cut out free-hand and sponged with ink. The vines are skinny strips of cardstock that I wrapped tightly around a toothpick and then slid off, attaching with Gluedots under the edge of the flower. The background paper is from the CTMH "Bella" collection. I used black cardstock and a Martha Stewart border punch to create the edge, and then attached a strip of black polka dot organza ribbon to the bottom. Here's the card I created using their free flower design...the rules of the challenge were that I had to use one of their designs and something sparkly on the project, so I added bling to my flower image:


The vines on my flower got a little squished in the scanner - oops! Anyway, if you'd like to check out the freebies on Glitterbabe's blog, click HERE...cute stuff!

Thanks for looking and have a TERRIFIC week!!!

Blessings,
Photobucket

Monday, October 25, 2010

Justin's B-day Photos and the Recipe of the Week...Becky B.'s Baked Beans

Just a quick post, as promised, to share a few photos of the cookout we had at our home on Saturday to celebrate Justin's 21st birthday. Even though it rained and we had to bring the party inside, we had such a fun time getting together with family and friends! Mike did an outstanding job cooking burgers, hot dogs and hot links on the grill! At the bottom of this post is the recipe for my baked beans...Justin said that I shouldn't give the recipe away because the beans are so good that I could sell the recipe and we'd be millionaires...ha! ha! ha! What a funny guy! I'm gonna take my chances and share the recipe with you anyway!
Now, on to the party photos:

Here's one of Justin holding his birthday cake, which represents the mule deer hunting trip that he's booked to go on in December. It's a guided hunt and he'll be staying on a 60,000 acre ranch in mountains of N.W. New Mexico for a week. He's always been a TOTAL outdoorsman and is sooooo excited about the trip!!!


Here's one of Justin and some of his buddies...they're such a good bunch of guys! From left to right are:
Grant Dickinson, Brian McGuire, David Norwood and Justin.


Here's one of Justin with my folks, aka Bubba and Nana:


Not all of the "Brown Clan" could make it, due to other commitments, but here are the one's that could come:
From left to right: Logan, Justin, LeaAnn - holding Kayle Ann, John, Royce, Don, Megan, JT, Ian and Sandy


The photo I took of Beth Ann and Nathan, two of Justin's cousins, didn't turn out due to bad lighting - dang it! -so I couldn't post it...sorry kiddos!

Lastly, here's one of just the three of us: Justin, Me and Mike


Now here's the recipe for my Baked Beans...sorry, Justin, but I've just gotta share!!


INGREDIENTS:
  • 6 cans Pork-n-Beans
  • 8 slices thick cut bacon, diced
  • 1 onion, diced
  • 1 green pepper, diced
  • 1 Tablespoon Worchestershire Sauce
  • 1 Tablespoon red pepper flakes
  • 2 teaspoons paprika
  • 3 Tablespoons yellow mustard
  • 1 cup brown sugar
  • 1 cup ketchup
  • 1 cup barbeque sauce (I use Sweet Baby Ray's brand barbeque sauce...we like the spicy flavor of it)
  • 2 teaspoons garlic powder
  • Freshly ground pepper to taste
  • Salt to taste
METHOD:
In large, covered skillet cook bacon, onion and green pepper until onion is clear. Place into large crockpot. Add all of the other ingredients and stir well. Cook on low for 12 to 14 hours, stirring a couple of times throughout the cooking process. This recipe feeds a large crowd, but it can be halved if needed. I like to make a big batch, though, because we rarely have leftovers since most everyone goes back for second and third helpings!

Hope you have a GREAT week!!
Photobucket

Saturday, October 23, 2010

Distressed Mini Halloween Treat Tin Tutorial


I'm up bright and early this morning to put the final touches on everything for Justin's birthday party this afternoon, so as promised in last Sunday's blog post, I thought I'd take a minute to go ahead and post a mini tutorial explaining how I created the adorable distressed mini treat tin for Halloween:

Start off by giving your tin two thin coats of rusty orange paint, allowing the paint to dry between coats. (I used Americana brand acrylic paint in Burnt Orange, which I purchased at Hobby Lobby). Once both coats of paint have thoroughly dried, use a small piece of fine grit sandpaper and lightly scuff up paint on the tin. Using a sponge dipped in black and brown ink, sponge over the entire tin and lid to give a worn/aged look to it. (The tin will now look like something that came right out of your grandpa's barn, which is exactly the look you're going for!)

Cut a length of black and white checked ribbon to go around the center of the tin, and tie a simple knot in one end of the ribbon. Wrap the ribbon around the tin, securing with glue dots above, but don't attach the knotted tail yet as you'll want it to rest on top of your stamped image as shown in the top photo above. Cut various, staggered lengths of black and white checked ribbon and tie onto the handle of the tin.

Stamp your favorite Halloween images in black on coordinating colored cardstock. (I used CTMH Desert Sand and Terracotta cardstock and the "Beware" stamp set from CTMH as well). Cut out your stamped images and add bitty sparkles from CTMH to the bats to create eyes. Attach images using 3-D dots to add dimension. Using a glue dot, attach the knotted tail of the ribbon that you've wrapped around the tin to the image that you've placed on the front.

Tie a piece of hemp through a green button and fray the ends of the hemp. Attach to the image on the front of the tin using a glue dot or two.  Viola...your cute litte treat tin is now ready to fill with candies, (or a gift card!), to give to your favorite ghost or goblin!

NOTE: Any shape/style of tin could be used for this project...I used a band-aid style tin that I purchased at Joann.com a while back. Other great online sources for tins are Creativexpress.com and OrientalTrading.com

Have a fun and safe weekend!
Photobucket

Thursday, October 21, 2010

Recipe of the Week...A "Two-fer!": Mexi-Corn Dip and Mexi-Corn Soup


My friend, Carolyn Hodges, shared this recipe with me 10 years ago when we both worked in the office at Arrowhead Elementary. (Thanks, Carolyn!) It's a delicious dish to share with a crowd since it makes about 4 cups of dip! I like to serve it with "Toppers" crackers, but it can be served with tortilla chips too. Here's the recipe:

Ingredients:
  • 8 oz. shredded sharp cheddar cheese
  • 1/4 pound of Velveeta, cubed
  • 1/4 cup milk
  • 1/2 onion, finely chopped
  • 1 can Mexi-Corn, drained
  • 8 oz. light sour cream
  • 3/4 cup light mayo
  • Toppers crackers
Method:
Combine chopped onion, milk and cheeses in sauce pan and melt cheeses over low heat, stirring continually. In large bowl, combine the other ingredients. Add melted cheese and onion mixture and stir until completely blended. Set in refrigerator overnight before serving with Toppers crackers. YUM!

I served this to the ladies at my scrapbooking workshop last Saturday and they loved it! I had some leftover though, so I decided to use it to create a "Mexi-Corn" soup, which I served for dinner on Monday night...and the guys loved it! Here's a photo and the recipe:


Ingredients:
  • 1 1/2 cups Mexi-Corn dip
  • 1 can chicken broth
  • 2 chicken breasts, cooked and shredded
  • 1 can Rotel
  • 1 can corn
  • 1/2 tsp. garlic powder
  • Salt and pepper to taste
Method:
Add all ingredients to a crockpot and stir to combine. Cook on low for 6 - 8 hours. Serve with tortilla chips if desired. DELICIOUS!
Photobucket