Pages

Saturday, April 30, 2011

A Wedding Shower Card and a Sneak Peek at Another Item That Will Be in My Upcoming Etsy Store


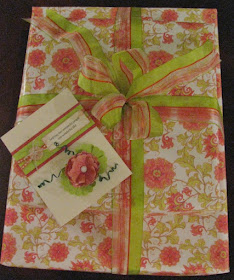
I made the above card to attach to the wedding shower gifts for the daughter of good friends of ours who will be getting married in May. I recently attended her lovely shower which was hosted by ladies from our church...here is a picture of the card attached to the gifts:


I found the beautiful wrapping at Tuesday Morning and I snagged the coordinating ribbon from the $1.00 bin at Michael's! I created the card to match the gorgeous paper and ribbon. The sentiment on the outside of the card says "Wishing two wonderful people one wonderful life!" The sentiment on the inside of the card says "May love and joy live in your hearts always!"

One of the gifts that I gave to her was this:


It's the happy couple's engagement picture that I altered and adhered to a stone tile and decorated with inked images - pretty cool, huh?!? (Click on the photo if you'd like a closer-view of the tile). I will be making these beautiful, customized tiles to sell in my Etsy store, which I hope to have up and running in the next week or so! The tiles measure about 6" x 6" and have an aged/distressed/shabby chic look that I just love! Customers will be able to scan/email their favorite snapshots to me and I will then create a unique, customized photo treasure just for them! Stay tuned so you'll be one of the first to know when my Etsy shop opens for business!

Have a fun and safe weekend!
Photobucket

Friday, April 29, 2011

Happiness!! A BEAUTIFUL Royal Wedding!!

Good morning, friends! I've been up since 3:15 a.m. (CST) to watch the much-awaited royal wedding of Prince William and Kate Middleton! It was soooo worth getting up early for! The ceremony was lovely...I even got a little teary eyed! William looked so handsome and Kate was incredibly beautiful in her elegant dress - don't you think so too??

I just had to join in on the fun of all of the Royal Wedding festivities, and my sweetie couldn't resist snapping these silly photos of me donning my comfy sock-monkey print pajama pants, a Bass Pro t-shirt and pink softie socks! The ensemble was topped off with a crown of my own...which was given to me on my birthday a couple of years ago by my dear friend Tracy! (Tracy and I had fun texting each other during the whole wedding...oooing and ahhhing at all of the outfits!! But what was up with Princess Beatrice's hat?!?!?)


Watching the festivities from the best seat in the house...my recliner!!


Now I'm just anxiously awaiting the kiss between William and Kate on the balcony of Buckingham Palace!!!

Cheery-O!!
Photobucket

Wednesday, April 27, 2011

Recipe of the Week...Glazed Cranberry-Orange Scones

In honor of the Royal Wedding this week I baked up a batch of Glazed Cranberry-Orange Scones and took them to work to share with the the folks in my department. Below is my recipe...I hope you enjoy them as much as they did!


Ingredients:
  • 1 cup frozen cranberries
  • 3 cups flour
  • 2/3 cup sugar
  • 2 1/2 teaspoons baking powder
  • 1/2 teaspoon baking soda
  • pinch of salt
  • 3/4 cups cold butter, sliced
  • 1/2 cup cold milk
  • 1/4 cup cold orange juice
Method:
Preheat oven to 400 degrees. Rinse and coarsely chop cranberries with a food processor; set aside. Line 2 jelly roll pans with baker's parchment paper. In a large bowl stir together flour, sugar, baking powder and baking soda. Cut in butter until mixture is crumbly. Make a well in the center of the flour mixture and set aside. In a medium bowl combine the milk, orange juice and chopped cranberries. Add to dry mixture and stir until combined. Flour hands and turn dough out onto floured countertop. Gently knead until dough is smooth, adding a little more flour if needed, and divide dough in half. Pat each half of dough into an 8 inch circle that is about a half inch thick and cut each circle into 8 wedges. Place wedges on parchment lined baking sheets and bake for about 12 minutes or until the tops of the scones are lightly browned. Remove to wire rack to slightly cool.

Orange-Almond Glaze:
In a small mixing bowl beat together 1/2 teaspoon almond extract and 1 Tablespoon softened butter. Gradually add 1 1/2 cups powdered sugar and 3 Tablespoons orange juice. Mix until well combined and drizzle glaze over the tops of warm scones before serving. Enjoy with a "spot-o-tea" or a glass of milk!

Yield: 16 scones.

Have a jolly good day!!
Photobucket

Monday, April 25, 2011

Royal Wedding Excitement!!


I am sooooo excited about the wedding of Prince William and Kate Middleton this Friday - how about you?!?! So much so that I am taking a vacation day from work to spend the day watching the Royal Wedding and all of the festivities on the "telly". I just couldn't record the event and watch it later...I knew that I needed to watch it live; to be one of the millions of spectators seeing it as it was happening!! (Yes, I know that means that I'll have to get up at about 3:00 a.m. since England time is 6 hours ahead of us here in Oklahoma! Luckily I'm a morning person - ha! ha!) I was only 14 years old when Prince Charles and Lady Diana Spencer wed; and I was parked right in front of my parents' television set watching every minute of that wedding too! Hang on to your knickers, folks...history is unfolding right in front of us!

So, in honor of the Royal Wedding that will take place this Friday, stay tuned for a special "Recipe of the Week" that I will be posting in a couple of days...Glazed Cranberry-Orange Scones. After all, Govna, what's a week of celebrating the Royal's and their magnificent British traditions without scones and a "spot-o-tea"??

Blessings,
Photobucket

Sunday, April 24, 2011

Happy Easter!


Wishing you a blessed Easter!
Photobucket

Saturday, April 23, 2011

A Little Birthday Gift for a Friend and a "Sneak Peek" at One of the Items That I'll Have in My Etsy Store...

My dear friend, Linda H., celebrated a birthday on April 15th. (Both of her sons are accountants, so she jokes that since her birthday is on tax day they shouldn't ever forget it - ha! ha!) I treated her to lunch last week and gave her this cute flower arrangement that I made:


It's hard to believe that the geranium is a silk plant and not the real thing, isn't it?? Here are close-up photos of the tag and hand stitched felt flower:


I will be making several of these cuties to sell on my Etsy shop, which I hope to have open for business in the next week or two! I will have various tag options available for customers to choose from using quotes for occasions such as birthday, friendship, happiness, etc.

Have a WONDERFUL Easter weekend!!

Photobucket

Thursday, April 21, 2011

Recipe of the Week..."Empty Tombs"

As some of you may know, many years ago I was a preschool teacher at a Christian preschool program. I also spent several years teaching 2 and 3 year olds at our church. Each year during Easter-time when I would share a lesson about Christ's crucifixion and resurrection I would let the kiddos make "Empty Tombs" as a snack and to use as a visual to explain that Jesus was alive and the tomb was empty. (Don't worry - I did all of the baking part!!) Here's a photo of an "Empty Tomb" before adding powdered sugar:


And here's a plate of "Empty Tombs" after dusting them with powdered sugar...Yummmm!


These are SUPER SIMPLE to make, and I encourage you to share the Easter Story with the kiddos in your life by making some of these sweet treats! Here's how you make them:

Ingredients:
  • 1 package refrigerated homestyle biscuits
  • 8 large marshmallows
  • powdered sugar
Method:
Preheat oven following package directions on refrigerated biscuit can. Open biscuit can and remove biscuit dough. Flatten out each biscuit and add a marshmallow to the center of each. Wrap the biscuit dough around the marshmallow and pinch the top closed. Place marshmallow filled biscuits onto a baking sheet. Bake for about 10 minutes or until biscuits are lightly browned and the marshmallow is melted and gooey, leaving a "hole" in the center of the biscuit representing the "Empty Tomb". Place on a plate and dust with powdered sugar. Serve warm while sharing the resurrection story with your little ones...so simple and delicious!!

Have a blessed day!
Photobucket

Wednesday, April 20, 2011

Thank You Card


Here's a simple little thank you card that I whipped up. The word "thanks" is cut from textured light pink cardstock using my Cricut and the Don Juan cartridge. I applied Xyron adhesive to the back side of a piece of 5 1/2" x 4" pink polka-dot paper and applied it to a standard A2 card blank. I attached a scrap piece of black striped paper to the center of the card, and adhered a piece of black and white polka dot ribbon to the striped paper using Glue Dots. The dark pink daisies were also cut with my Cricut and the Don Juan cartridge. I attached a black brad to the centers of both flowers and attached them on either side of the word "thanks" with a Glue Dot. The phrase is stamped directly onto the polka-dot paper using black ink from CTMH and the "A Little Everything" stamp set.

Thanks for looking! Have a blessed day!
Photobucket

Sunday, April 17, 2011

Quote Sunday

"If I could hear Christ praying for me in the next room, I would not fear a million enemies. Yet distance makes no difference...He is praying for me." ~Robert Murray McCheyne Photobucket

Saturday, April 16, 2011

Sweeeeet Flea Market Finds...

Happy Saturday! Last weekend Mike and I went to the flea market just to browse around and see if we could score any treasures. Mike didn't find anything, but I did!! Here are the awesome treasures that I found:

A really cool and sturdy wooden chair for only $20 bucks...it will eventually end up in my scrapbook room!


An old cigar box, with a wooden bottom, for only $3 bucks...I have plans to alter it and make something cool from it!


Two pieces of ornamental iron...I bought both pieces for only $20 bucks! I currently have one of them in a flower bed in the corner of our backyard, but I haven't decided what I'm going to do with the second one yet...so many possibilities!! (Send me an email if you have any good ideas!!)


And last, but not least, is my favorite find from our flea market adventure....an old, super cute, metal basket! When I first bought it I had plans to line it with flower pots to grow herbs in....but then I changed my mind and decided to put geraniums in the pots instead! I love the way the red flowers add a perfect "pop" of color under my fun back porch sign that reads, "What happens on the porch stays on the porch".

This basket was the most expensive item that I bought...even after sweet-talkin' the vendor to come down on his price, I still ended up paying $28 bucks for it. I just haaaaad to have it though! It was one of those pieces that once I spotted it I had to own it - ha! ha! Here's the basket before adding the flower pots and geraniums:


And here it is with the flowerpots and geraniums - so pretty!


If you're wondering where I bought the fun sign for my back porch, I ordered it from one of my favorite stores "The Country House".  Click HERE to go to their online store to request a free catalog...soooooo many cute, cute things!!

Blessings,
Photobucket

Friday, April 15, 2011

Birthday Card and Another Blog Makeover

Lately I've been in a card making mood, more so than a scrapbooking mood, so I'll be sharing several card posts with you in the next few days. To start the "card parade", I'm sharing the card that I made and sent to my sister Sarah, who celebrated a birthday on Tuesday....


As you can see, I incorporated a smaller version of the torn fabric flower, (tutorial HERE), and used ric-rac for the flower stem and leaves. Also, instead of using a button for the flower center, I used black gingham ribbon that I tied into a little bow to add some nice color contrast.

Lastly, I took a vacation day from work today and spent some time giving my blog a "make-over". (I should have been catching up on laundry, but this was a much more fun task for a cold and rainy afternoon!!) You'll notice at the top of my blog, just under the heading, I've added a new "coming soon" feature, which is where I will link my upcoming Etsy store! I'll be starting out small on Etsy and then adding more creative projects to sell as time allows. I hope to have the Etsy store up and running in the next few weeks, so stay tuned because in the next few days I'll be posting a "sneak-peek" of one of the items that I'll be selling in my Etsy store!

Thanks for looking! Have a fun and safe weekend!
Photobucket

Wednesday, April 13, 2011

Recipe of the Week...Sour Cream Banana Coffee Cake with Chocolate Chips

Here's another tasty recipe for using up ripe bananas!

Ingredients:
  • 1 cup semi-sweet chocolate chips, chopped
  • 1 cup pecans, chopped
  • 2 teaspoons ground cinnamon
  • 1 3/4 cups granulated sugar
  • 1/2 cup unsalted butter, softened
  • 3 eggs, beaten
  • 2 ripe bananas, mashed
  • 8 oz. fat-free sour cream
  • 3 cups all-purpose flour
  • 2 teaspoons baking powder
  • 1 teaspoon baking soda
Method:
Heat oven to 350 degrees. Lightly butter the inside of a bundt pan. In a small mixing bowl combine chopped chocolate chips, chopped pecans, 1/2 teaspoon of the cinnamon, and 1/4 cup of the sugar. Set aside.

In a large mixing bowl, beat together softened butter with remaining sugar and cinnamon. Add remaining cake ingredients and beat until smooth.

Sprinkle a third of the chocolate/pecan/cinnamon/sugar mixture on the inside of the buttered bundt pan. Drop in half of the batter; sprinkle another third of the chocolate/pecan/cinnamon/sugar mixture on top of batter. Repeat steps, ending with the remaining chocolate/pecan/cinnamon/sugar mixture on top.

Bake for 45 to 50 minutes or until cake tester comes out clean. Allow to cool in pan for about 20 minutes, then carefully turn cake out onto cooling rack. Once completely cooled, place on a serving plate, slice and enjoy! Wonderful served with coffee or milk for a brunch or as an afternoon snack.

Blessings,
Photobucket

Monday, April 11, 2011

Brilliant Idea!! New Purpose for a Metal Measuring Tape


My sis-in-law, Sandy, has recently gotten into quilting/sewing. (Remember the adorable matching aprons that she made for all of the gals in our family at Christmas? Click HERE to see them). Well, here is another one of her super cute quilted projects that I am the proud owner of...a set of matching cosmetic bags:


You simply pull on the little dog-eared tabs on each side of the bag, and it springs open:


Okay...now for the BRILLIANT IDEA part of these little bags! Sandy cut a metal measuring tape into pieces long enough to run through the inside of the contrasting fabric bands along the top of each of the bags. This is what causes them to "spring" open and closed:


Is that a SUPER CLEVER idea or what?!?!? Thanks, Sandy, for the adorable make-up bags...I love them!

Have a wonderful day!
Photobucket

Sunday, April 10, 2011

Quote Sunday


"Women are angels and when someone breaks our wings, we simply continue to fly.....on a broomstick. We are flexible like that." ~ Unknown
Photobucket

Thursday, April 7, 2011

Triangle Treat Box Tutorial

As promised earlier this week, here is the fun little project that you can attach the torn fabric flowers to:


It's a triangle shaped treat box, which is just perfect for filling up with chocolates, jewelry, a gift card, etc.! My friend/co-worker Margaret showed me how to create these little boxes, (thanks, Margaret!!), so I am sharing her instructions with you!

Begin by cutting a piece of cardstock 4" wide x 10" long. (I used double sided gingham checked cardstock so that the inside of the box would look as cute as the outside!) Score at 5" on the long side:


With a pencil, lightly mark the center at 2" on each of the 4" ends:


Score at an angle from the 2" mark to the center score mark, repeating for all 4 edges:


Fold all 4 of these scored edges upward so that your triangle box looks like this:


Fold along the center score line so that your triangle box will close:


Align the ends and punch holes in the ends of your triangle box using a Crop-a-Dile:


Using Terrifically Tacky Tape, attach the fabric flower to the top of your box:


Tear a strip of fabric to match your flower, keeping the ends frayed to give a "home-spun" look, and lace the torn fabric through the holes so that your box can be tied shut:


Fill the box with treats, tie to close, and you've got a cute and unique little gift to brighten someones day!

Happy Scrappin'!!
Photobucket