Pages
▼
Friday, September 30, 2011
Frosted Designs Challenge..."Fussy Cutting"
This week's challenge over at Frosted Designs is to create a project using "fussy cutting". I created the above layout, (using a photo from a couple of years ago when when I had short hair!), and hand cut all of the stamped images. I then attached the images to the layout using 3-D dots so that they would "pop" off of the page and add the extra dimension that I so love! (To see an enlarged, close-up view of the layout, please click on the photo).
I'd love to see your "fussy cutting" creations...so why not enter your fantastic projects in the challenge over at Frosted Designs?? You have until noon on October 6th to link up your project(s)...click HERE to check out the challenge and prize details!
Happy Scrappin'!!
Thursday, September 29, 2011
Recipe of the Week...Fiesta Chicken and Rice
Last weekend I made Mike one of his favorite meals, Fiesta Chicken and Rice, and realized that I haven't yet shared my recipe for that yummy dish! It's a wonderful meal that is so fast to pull together, and if you're lucky enough to have any leftovers, they are great to take for lunch the next day!
Ingredients:
Spray the inside of a crockpot with non-stick cooking spray. Rinse chicken breasts, pat dry, and layer in crockpot. Add one can of Rotel (undrained) over the top of the chicken. Top crockpot with lid and cook on low for 6 hours.
Prepare Minute Rice according to package directions. While rice is cooking, prepare cheese sauce in a small sauce pan by combining 3 slices of American cheese that have been torn apart, 1 Tbsp. milk, and 3 Tbsp. of Rotel tomatoes that have been skimmed from the top of the chicken in the crockpot. (Do not add any of the liquid from the crockpot to the cheese sauce - just the tomatoes). Melt cheese sauce ingredients together over low heat, stirring constantly to prevent burning or scorching.
Spread cooked rice on a serving platter and add cooked chicken, spooning the cooked Rotel tomatoes over the top of the chicken. (Not the liquid, just the tomatoes). Pour the cheese sauce over the chicken and rice and serve. Delicious!
Have a happy day!
Ingredients:
- 4 large boneless, skinless chicken breasts
- 1 can Rotel
- 1 bag Minute Rice
- 3 slices American cheese
- 1 Tbsp. milk
Spray the inside of a crockpot with non-stick cooking spray. Rinse chicken breasts, pat dry, and layer in crockpot. Add one can of Rotel (undrained) over the top of the chicken. Top crockpot with lid and cook on low for 6 hours.
Prepare Minute Rice according to package directions. While rice is cooking, prepare cheese sauce in a small sauce pan by combining 3 slices of American cheese that have been torn apart, 1 Tbsp. milk, and 3 Tbsp. of Rotel tomatoes that have been skimmed from the top of the chicken in the crockpot. (Do not add any of the liquid from the crockpot to the cheese sauce - just the tomatoes). Melt cheese sauce ingredients together over low heat, stirring constantly to prevent burning or scorching.
Spread cooked rice on a serving platter and add cooked chicken, spooning the cooked Rotel tomatoes over the top of the chicken. (Not the liquid, just the tomatoes). Pour the cheese sauce over the chicken and rice and serve. Delicious!
Have a happy day!
Wednesday, September 28, 2011
Just a Few Cards...
Sunday, September 25, 2011
Tutorial: Simple Felt Clutch
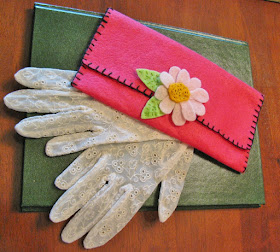
Hi, Everyone! I'm really excited to be the Design Team Member hosting this week's "Show Me Sunday" tutorial over at Frosted Designs! The tutorial I am sharing, (both on the Frosted Designs website as well as here), teaches you how to whip up a super cute felt clutch in just a matter of minutes. These are great little accessories to carry in your purse to discretely hold "unmentionables". They also make terrific/inexpensive gifts for friends and co-workers...just add pens, pencils, markers, notepads, candy...the skies the limit! Here are the supplies you'll need for this project:
- 9" x 12" piece of felt for clutch (I used hot pink)
- Scraps of felt for flower (I used baby pink, yellow, and lime green)
- Embroidery floss (I used black and green)
- Tiny piece of fiberfill
- Velcro
- Scissors
- Any other decorative trim that you'd like to add (I ended up not using the rick-rack on this clutch)
Using a blanket stitch; stitch around the outside edges of the clutch and across the top edge of the inside of the pocket with six strands of embroidery floss.
Not sure how to do a blanket stitch? It's an easy stitch that adds a wonderful, finished look to all kinds of projects! Here's a simple diagram to show you how:
Your stitched clutch should now look like this:
To create the felt flower, loosely draw two flowers on a piece of felt. You'll also need to draw an oval on a piece of yellow felt for the center of the flower:
Cut the pieces out and layer them. Add a tiny piece of fiberfill batting under the yellow oval to give it a slight "puffy" effect. Using two strands of embroidery floss, stitch the layers together in the flower's center, tucking under the yellow edges and catching them with the running stitches as you go:
Cut two leaf shapes from green felt, and stitch "veins" on the leaves with a slightly darker green embroidery floss. Carefully gather the bottom of the leaves to add a little more detail, and then stitch the leaves to the underside of the felt flower:
Carefully tack the felt flower to the top flap of the clutch. Attach an adhesive-backed Velcro circle to the underside of the flap to hide the stitching where you attached the flower:
Your cute felt clutch is now complete!
A few variations can easily be made to this project. You can cut the felt in half or into thirds to make smaller clutches. Also, you can divide the pockets into two or more sections by stitching up from the bottom. A ribbon handle or strap can be attached to the underside of the flap to create an adorable purse for a little girl. Lastly, by slightly adjusting the size of the clutch, you can create a cover for a plastic travel baby wipe case...a cute accessory for a girly diaper bag!
On a final note, if you haven't taken the opportunity to check out the Frosted Designs website, I HIGHLY recommend that you do so! I just KNOW that you will be totally inspired and will come away with some fabulous crafty ideas! Once you've browsed their site and taken in all of the fantastic ideas there, you'll see why I feel so honored and privileged to be one of their new Design Team Members, and to be able to collaborate with the other amazingly talented DT members there!
Thanks so much for letting me share this project with you! I hope that you will enjoy making and giving these to the special ladies in your life! Have a WONDERFUL week!
Happy crafting!
Saturday, September 24, 2011
Silly Saturday...
Our homecoming football game was last night, so this past week our district celebrated "Spirit Week" at our school sites. Each day there was a different theme, with Tuesday being "Nerd Day". I just couldn't resist having fun right along with the students at the school where I work, so the above is a photo of me all decked out in "Nerd Wear" - HA! HA! It's so fun working with teenagers...they are such a hoot!
Have a FANTASTIC and FUN weekend!
Thursday, September 22, 2011
Recipe of the Week..."Nutties"
Here's a sweet treat that is fantastically fast to whip up! Served with a big glass of cold milk, these can satisfy a craving for chocolate and peanut butter all at once!
Ingredients:
- 1 stick margarine
- 2 cups granulated sugar
- 1/2 cup milk
- 1 tsp. vanilla
- 1 cup chunky peanut butter
- 1/2 cup chopped peanuts
- 3 cups raw quick oats
- 1/2 cup semi-sweet chocolate chips, melted
In a large pan combine margarine, sugar, milk and vanilla. Bring to a rolling boil and allow to boil for 1 minute unstirred. Remove from heat and stir in peanut butter until melted. Add quick oats and chopped peanuts and stir until mixture is completely combined. Drop by Tablespoonfuls onto waxed paper and allow to thoroughly cool. Once cooled, microwave chocolate chips in glass mixing bowl in 30 second increments until melted. (Stir melting chips every 30 seconds). Drizzle melted chocolate over cooled cookies and allow chocolate to become firm. Place in air tight container to keep fresh.
Enjoy!!
Wednesday, September 21, 2011
My son, "Mr. G.Q."??
Justin will probably be mortified when he knows that I posted this photo of him, but I just couldn't resist 'cause I think he's so handsome! He was a groomsman at his friend, Brian McGuire's, wedding on August 20th, which is why he's all decked out in a tux. When I told him that I thought he looked like a model in this photo, he just rolled his eyes at me and said, "Oh, mom!" in an exasperated voice - LOL! What can I say?!?!? I'm a momma that's proud of her boy...who has grown up to be an AMAZING young man!!!
Thanks for letting me brag on him again to you!
Blessings,
Monday, September 19, 2011
Tutorial: Stiff "Dried" Paper Flowers
As promised, here is the tutorial on how I created the stiff "dried" paper flowers for the Frosted Designs project that I posted last week:
Begin by punching out lots of various flowers and leaves from different colors of cardstock:
Next wet and crumple all of the flowers. If desired, you can wet and crumple the leaves too, but I didn't for this project:
Carefully un-crumple the flowers, finger shape and place on a towel to completely dry. Remember! Flowers in nature are "perfectly im-perfect, so don't over-obsess about the shapes!
Once the flowers have completely dried, lightly sponge them with ink to age and distress them even further:
Next lightly brush each dried flower with a pearl paint to add a little bit of glimmer:
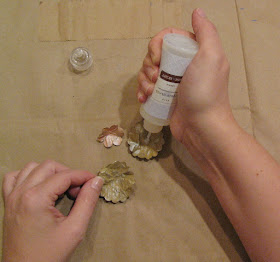
Once the paint has dried, use a liquid adhesive and begin building your flowers as desired by layering various pieces:
Pinch the flower in the center and use a pencil to curl the edges of the flower layers. Add a pearl bling or button to the center. Set flower aside to completely dry:
Once flowers have completely dried, arrange them on your project until you've come up with a placement that you're happy with. Adhere the flowers to your project using liquid adhesive and set aside to thoroughly dry. Here's another look at the finished project:
For a little different variation, click HERE to see the tutorial I did using stamped images...here's what the flowers from that project look like:
Just a friendly reminder...you have until noon this Thursday, September 22nd, to link up your "punched projects" to this week's Frosted Designs challenge! Click HERE for entry and prize details!
Thanks for looking! Have a FANTASTIC week!!