Pages

Tuesday, September 29, 2015

From Picket Fence Scraps to Shabby Chic Photo Frames

Hello!! I promise that I had every good intention to get this post up on Monday, but time got away from me and I'm just now able to sit down with my laptop to show you a trash-to-treasure project that I've been working on:


A while back my hubby was working on a fence project, and had several scrap pieces of the fence lumber left over. He was tossing them into the trash, (silly man!!), and I rescued the pieces because I knew that I would eventually create something with the scraps. I ended up using a few of them to create a cute, shabby-chic photo frames, so I thought you'd like to see how I made them.

I started out with several scraps of fencing, some Elmer's school glue, acrylic paint and a couple of sponge brushes:


I wanted to give the paint a crackle finish, so to do that inexpensively I first applied a coat of Elmer's glue to the wood, using a sponge brush to coat the glue evenly across the wood:


I let the glue set for about 5 minutes, then I applied a quick coat of acrylic paint with another sponge brush. It's important to only put a quick coat of paint over the glue; don't keep painting over the glue or you won't get the desired crackle finish that you're wanting. The paint application doesn't have to be perfect...after all, you're wanting an aged/distressed finish in the end. :)
 

As the paint dries, you'll begin to see the crackling finish appear. (Note: if you want more crackle in your paint, once everything is completely dry, repeat the steps above until you've achieved the finish that you like.)

While the paint is drying, I painted a paint stir stick in the same color. It will be used as a base on the photo display:


Here's a photo of the crackle finish on a couple of the wood scraps...I just love how amazingly simple this technique is and how fantastic the results are!


Now to decorate and assemble the frame display...

I purchased several little burlap flowers at Hobby Lobby, which just so happened to be on sale for 50% off. I thought they were a pretty good deal at just $1.00 each. I cut the wire stem off of the back. (Don't throw those away yet, though, as you'll see how I used the stems in this project...)


I wrapped and tied some jute twine around the base of each of the painted wood pieces, using a little dab of glue on the backside to keep it in place:


Next up, using some E6000 I attached the burlap flower to one corner and a small, painted clothes pin to the other corner. I set these aside until they were completely dry:


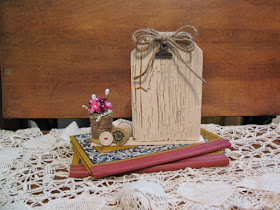
Once the embellishments were completely dry, I laid the painted stir stick at the base of the lined up fence pieces, and marked off with pencil on the stir stick exactly where I wanted each fence piece to go. Using more E6000 on the bottoms of the fence pieces, I attached them to the stir stick and then allowed everything to dry thoroughly. Here's another photo of the finished product:


Oh! I almost forgot! The wire pieces that I cut off of the bottoms of the burlap flowers have now become curly-vine accents to the flowers. I twisted the pieces around a toothpick; then carefully slid them off and used a dot of glue to attach them. I also added some pearl-head corsage pins for a little extra detail.

Here's a photo of the display with pictures of my great niece Kayle and 2 of my great nephews, Jack and Ian. (Aren't they just so cute??)


I then got a little more creative and decided to make a few more of these photo display frames...

This one is for a single photo and uses a little metal clip, instead of a clothes pin, to hold a photo in place. I also added a couple of old wooden spools, buttons and tiny silk flowers as embellishment on the outer edge of a paint stick that was cut in half for the base. (Once again, I used E6000 adhesive to hold everything in place.)


I also made one using a tiny little bird nest with artificial eggs as an embellishment:


I REALLY LOVE how cute these turned out! I've got several more wood scraps from Mike's fence project, so I'll be making some more fun projects like this one, for sure!

Thanks so much for dropping by my blog today to check out what I've been up to. Wishing you a wonderful week ahead!

Blessings,

Photobucket

Sunday, September 27, 2015

Quote Sunday


Be happy and have a WONDERFUL day! :) 


Photobucket

Wednesday, September 23, 2015

Dollar Tree Pumpkin Makeover

WOOHOO!!! Today is the first day of fall, which is my very favorite time of the year! This coming weekend I'll put up my fall decorations, but I decided to work on a little project this past weekend to get a head start:


I started out with 5 painted Styrofoam pumpkins that I picked up at the Dollar Tree:


They were very bright orange and shiny, and I thought that a little aging/distressing was in order, so I mixed up a little black and brown acrylic paint with a bit of water to create a wash to cover the pumpkins:


Using a sponge brush, I applied the wash to the pumpkins and then dabbed off the excess paint with a paper towel:


After the paint wash dried, here's how the pumpkins look...the shiny orange is gone and they've got a nice, antiqued look to them:


Since I planned to put these in a little garden cart in my front flower bed, I didn't want them to blow away as the fall winds kick up, so I placed a wooden skewer into the base of each pumpkin so that I could secure them in the garden cart:


I wrapped a cardboard box in plastic shopping bags, covered the box with straw, pinecones and artificial leaves before placing the skewers into the cardboard box to secure the pumpkins in the cart:


I think they turned out pretty well, and even better, I've only got $5 invested in this seasonal display! When the end of the season is over, and it's time to start decorating for Christmas, I can just toss the pumpkins if they look bad.

Here are a couple of pics of some of the decorations that I put out on my front porch:


I've got the materials to make a new fall wreath this coming weekend, but for now I just put up the one that I already had:

Be sure to check back next week to see the new fall wreath that I'm making this weekend. I hope that the rest of your week runs smoothly and that your upcoming weekend is TERRIFIC!!

Blessings,
Photobucket

Monday, September 21, 2015

Recipe of the Week: Amazing Coconut Pie

Good morning, friends! I had a busy weekend...along with my normal house-hold/laundry chores, I managed to also make a batch of apple butter, finished 2 craft projects that I started last weekend, (tutorials forthcoming on those projects!), made my sweetie a chocolate pie and then tried a new recipe that my sis-in-law Sandy shared with me, which is the recipe that I am sharing with you today!

I LOVE coconut cream pie, so Sandy was telling me about a recipe that she found on the back of a bag of Baker's Coconut for "Amazing Coconut Pie". Anyhoo, I decided to try it out yesterday and although this pie has more of a custard taste and texture, versus the typical creamy texture of a coconut cream pie, it turned out pretty good!


I think that a little more coconut flavor would make this super simple pie even better, so I am going to try using 1 cup of coconut milk and 1 cup of milk vs. 2 cups of milk the next time that I make this. I may even add a little more vanilla that the recipe calls for as well. (I'll let you know the results of my version/recipe change in a future post.) If you'd like to make one of these easy pies, here's the recipe...and if you try using coconut milk before I get a chance to try that addition, let me know how it turns out...

INGREDIENTS:

  • 2 cups milk
  • 1 3/4 cup sugar
  • 1/2 cup Bisquick
  • 4 eggs
  • 1/4 cup (1/2 stick) of butter or margarine
  • 1 tsp. vanilla
  • 1 1/3 cups flake coconut
METHOD:

Place milk, sugar, Bisquick, eggs butter and vanilla in blender container, cover and blend on low speed for 3 minutes. Pour mixture into a greased 9" pie plate and sprinkle top with coconut.

Bake at 350 degrees for 40 minutes or until center of pie is set and top is golden brown. Serve warm or cool on wire rack before serving. Store leftover pie in the refrigerator.

Thanks for dropping by today! Be sure to check back in a couple of days to see the latest craft project/tutorial that I've been working on! :)

Have a WONDERFUL week!!


Photobucket

Monday, September 7, 2015

Painting With My Little Pal Heather...

Hi, friends! I hope that you had a great Labor Day weekend! I moved the furniture around in my guest room and cleaned out/organized a closet. I took a bunch of stuff to consign at Uptown Resale in Broken Arrow, and I dropped off several bags of goodies at our local Goodwill store for donation. Needless to say, it was a very productive weekend! In the near future I plan on pulling everything out of our master bedroom closet and organize/sort/donate clothes, shoes, etc. that we no longer wear/use. I LOVE it when everything in orderly, organized and in it's place! :)

On Monday morning my little crafting pal Heather, who is the youngest daughter of my friend Megan F., came over to paint a canvas with me. She is such a sweetie and loves to craft! Here is a photo of her adding the base coat to the canvas that she painted:


Here she is with her completed masterpiece, all ready for her room! She created the pink petals of the flower buds with the bottom of a small, plastic pop bottle; the tiny pink petal details with the end of a plastic coffee stirrer and the yellow flower centers were made by dipping the end of a cork into yellow paint. I love the pretty colors...so girly! :)


Well, tomorrow it's back to work, so have a wonderful and productive week! Thanks for dropping by to check out my blog...

Blessings,
Photobucket

Thursday, September 3, 2015

Sandy's Pantry Make-Over...

Hi, folks! As I mentioned earlier this week, last Saturday I visited my SIL Sandy to help her organize her pantry. Here are a few before and after photos of that project:

First off, here is what her pantry looked like before we removed everything...lots of packages, bottles, etc.:


Before I arrived at her house, Sandy and her daughter Kari took everything out of the pantry and stacked it on the dining room table, kitchen counters and the bar:


Here's the empty pantry, all ready to be organized:


We started out by combining multiple packages of same items, such as pasta and cereal, into their own air-tight containers. This eliminated extra boxes/packaging, which takes up a lot of precious shelf space. We sorted through the spices, flavorings and food color and discarded anything that was expired/out of date. We combined like items, such as drink mixes, hot cocoa mixes, tea bags, etc. into their own bin and designated a specific area for them on one of the shelves. We continued with that method with other products such as breakfast foods, canned goods, pastas and sauces, etc.; clearly labeling the containers for easy access. We also designated areas for pots, pans and casserole dishes:


Sandy was so happy with her newly organized pantry, and I was so happy that I could help her with this project! I hope this has inspired you to go through your pantry and discard expired food goods or combine duplicate packages of foods that you have on hand. You'll be amazed at how much space can be saved in your storage area just by doing that. :)

Wishing you a fun and safe Labor Day weekend!

Blessings,
Photobucket