Monday, January 31, 2011

Free Online Photography Class Opportunity: "The Joy of Love"


During the month of February a FREE online class is being offered by Kelly McMahon Willette, author of the photography e-book Finding the Joy. Click HERE for all the details and to sign up!! Each morning, beginning Feb. 1st, participants will receive an email "lesson" which includes prompts and photo assignments. You can follow the assignment/prompt each day, if you like. It's that easy!! Some tutorials and instructions are built into the daily lessons as well. A public Flickr gallery will be created where you can share your work if you so choose.
 
Why not join me for this class, which starts on Tuesday, Feb. 1st??
Photobucket

Sunday, January 30, 2011

There's Blog Candy Being Given Away at Scrap It Girl's Crafty Blog!!

POST UPDATE 2-4-11: WOOHOO!! I received notice from Kimberly at "Scrap It Girl's Crafty Blog" that my name was drawn as the winner of her blog candy giveaway!! Thanks, Kimberly!!! You made my day!!

Becky B.

Good morning! Please take a minute to hop over to Scrap It Girl's Crafty Blog to sign up for some fun blog candy! All you have to do is become a follower of Kimberly's blog, (which is AWESOME!!), leave a comment on her blog candy post, and then link her blog candy giveaway to your blog. A winner will be chosen on Wednesday, February 2nd so don't wait!! Here's what she's offering:

A Slice apron (blue), a XL Spellbinders T-Shirt (pink), a ZVA creative canvas bag, an e-craft ruler, 2 Vellum quote sheets & a Powder puff chalk from Quick Quotes, and 2 yards of the Maya Road velvet scalloped ribbon. 


Have a great day!!
Photobucket

Saturday, January 29, 2011

Valentine Gift Bag and Card


I recently decorated a gift bag and card for Valentine's day using digital images from Glitterbabe's. Click HERE to go to her website/store to see the great images that she has for sale...she even has some free images for you to download!

The kraft bag was decorated with a piece of argyle scrapbook paper and a strip of black striped paper before adding the digital image embellishment, which is shown in larger detail in the photo below.

I printed the image and then colored in the hearts with a CTMH brush pen and cranberry ink. I stamped the word "LOVE" in the center of the heart and then sponged blush ink over the images; adding some sparkles to the image for a little bling pizazz! I cut the image out, using a Creative Memories circle cutter, and then cut out two corresponding layered mats, one in cranberry cardstock and one in black cardstock, and attached them all together. I added the lace to the outer edge of the black cardstock and then cut an additional black cardstock circle and adhered to the back of the embellishment to give it a nice, finished look. I attached the embellishment to the bag using 3-D dots to add a little dimension.


Next is a photo of the card that I created using a standard A2 card blank. I started by adhering a piece of black polka-dot paper to the front of the card. I printed off the digital image and colored it using a CTMH brush marker and cranberry, blush, bamboo and sunflower inks. I added some bling to the card as well...can a girl ever have too much bling??? I cut the image out with a Creative Memories oval cutter and matted it with a corresponding piece of cranberry cardstock. I applied a piece of grosgrain ribbon to the center of the card, and then added the digital image to the middle using 3-D dots.


Thanks for looking!! Have a blessed day!

Photobucket

Thursday, January 27, 2011

My Cleaning Arsenal and Cleaning Tips...

As many of my friends, family and co-workers know, I'm a bit of a clean freak! Many times they'll ask me how to get a stain out of a piece of clothing or how to tackle a specific tough cleaning job, and I'm always happy to share with them the tips and tricks that I've learned over the years while raising a son and being married to a fella who are outdoors enthusiasts and, therefore, dirt magnets! Here's a photo of my cleaning arsenal...below the photo is an itemized list of the products and just a few ways how I use each one:


Products left to right:

Front Row:
  • White Vinegar: This product is AWESOME for a ton of cleaning purposes and is completely safe for the environment! If my laundry, (especially bath towels), starts to smell a little soured I add a cup to the wash at the same time I add laundry soap. This makes my towels smell so fresh and clean!
  • Bar Keepers Friend: Gently scrubs my stainless steel kitchen sinks and leaves them amazingly shiny! Works great on stubborn stains, (like red Kool-Aid), on kitchen countertops too! 
  • Baking Soda: Pour a little bit down a smelly bathroom or kitchen drain and add a 1/4 to 1/2 cup of white vinegar...the chemical reaction will "boil" the odors away! Once again...completely natural and safe for the environment!
Back Row:
  • Swiffer Products: Do these even need an explaination?!?!? A GENIUS invented these! They make cleaning a breeze, and now that you can purchase them with the scent of "Febreez" added to the cloths, your house will smell so nice after swiffering the floor or dusting the furniture! I LOVE to use these to dust the dashboard, etc. in my car...they do a super job of picking up the dust that gets into all of the little cracks and crevices!
  • Microfiber Cloths: Gives my bathroom mirrors, windows, glass fronted cabinets and chrome fixtures that "WOW" factor! Doesn't leave any streaks behind...just an INCREDIBLE shine! I use them with water only, so these are also environmentally friendly!
  • Magic Erasers: Invented by yet another Genius!!! These little gems are fabulous for getting smudges off of painted walls and doors. They are also great for cleaning white leather tennis shoes, and when used on a glass shower door they do a terrific job of removing soap scum and water spots!
  • Clorox Wipes: I use these constantly to wipe down kitchen and bathroom counters, the TV remotes, phones, door knobs, light switches, bathroom fixtures, etc. A girl's gotta do what a girl's gotta do to keep germs at bay and these fit the bill nicely!
  • Lemon Oil: This natural product, applied with a soft cloth, will make your cabinets and furniture shine...and it smells wonderful to boot! It can also be applied to clean, glass shower doors or tile/fiberglass surrounds to repel water and cut down on water spots.
Now, if this post doesn't inspire you to get a jump start on your spring cleaning I don't know what will - HA! HA! Have a wonderful day!
Photobucket

Wednesday, January 26, 2011

Recipe of the Week...Chocolate Oatmeal Cake with Coconut Pecan Frosting


The recipe I'm sharing with you this week was given to me by my friend Jan A. many years ago, and it remains a family favorite to this day!! The cake is so moist and delicious and the frosting melts in your mouth...a wonderful combination of flavors!

Ingredients:
  • 1 cup rolled oats
  • 1 1/2 cup boiling water
  • 1/2 cup (1 stick) margarine
  • 1 1/2 cups sugar
  • 2 eggs
  • 1 cup flour
  • 1/2 cup powdered baking cocoa
  • 1 teaspoon soda
  • 1 teaspoon salt
  • 1 teaspoon vanilla
Method:

Mix oats and boiling water. Set aside to cool. Cream margarine, sugar, and eggs together. Add oat mixture and remaining ingredients, beating until smooth. Bake in a greased 9" x 13" pan for 35 minutes at 350 degrees. Top with icing recipe below:

Icing:
  • 1 cup powdered sugar
  • 2 cups flaked coconut
  • 2 Tablespoons margarine
  • 1/2 cup milk
  • 1/2 cup pecans
Add ingredients to medium saucepan and boil until thick, about 6 minutes. Pour over cooled cake.

Enjoy!!
Photobucket

Sunday, January 23, 2011

Stamped Tile Coaster Set Tutorial


Here's a quick and fun project that makes a terrific gift for almost any occasion! You could give individual coasters as "mini gifts" to co-workers or teachers, or you could tie the set together with a pretty organza ribbon to give as a housewarming gift, birthday gift, etc. These lovely coasters could be added to a gift basket with some pretty drinking glasses for a wedding gift as well! The options are endless!
Here's how I made them:

Begin with 4" x 4" tumbled marble tiles that you can pick up at any home improvement center. Wipe the tiles clean with a damp cloth.


Apply Timber Brown StazOn ink to an acrylic stamp. I used the following CTMH stamps for this project:
  • State of Mind
  • Find Your Style
  • Felicity
With a steady hand, carefully press the stamped images evenly onto the tiles.


Here are what my 4 tiles looked like before I sponged colored ink onto the images:


If you want to add just a hint of color to the images, lightly dab a sponge dauber on a colored StazOn ink pad and, with a light hand, carefully add ink to the images:

Here are what my tiles look like after applying a little colored ink:


To add a protective backing, you can use cork or felt pads. (Cork can be purchased by the roll or sheet at your local home improvement center). Cut the cork slightly smaller than your tile...I cut mine 3 1/2" x 3 1/2".


Apply Liquid Glass to the back of the cork and attach the it to the back of the tile. Hold in place for a couple of minutes and then turn the tile over to rest so that the weight will hold and stabilize the cork, allowing it to adhere firmly.


Lastly, spray the tops of the coasters with a sealant to protect your artwork and you're done! (I like to use Valspar's Clear Lacquer, which comes in a spray can). Here's another photo of the finished project:


I hope that this little tutorial was helpful and will inspire you to use your ink and stamps in a new way!

Blessings,
Photobucket

Saturday, January 22, 2011

Valentine, Wedding or Anniversary Card...


With Valentine's Day just around the corner, I'll be sharing some sweet "heart-related" projects with you during the next couple of weeks! The first one is a card that could be used for Valentine's Day, but would also be great for a wedding or anniversary card!

I started out with a blank, white standard A2 card and random stamped it using CTMH black and cranberry inks. I then used a Martha Stewart border punch on one edge of a strip of cranberry cardstock and attached it to the lower portion of the card edge. I trimmed the top edge of the punch with a black and white stitched ribbon, which I attached with Glue Dots.

To create the heart embellishment, I used the CTMH "Soul Mates" stamp set and inked the large heart with CTMH white daisy ink on black cardstock. (I love the way that white ink looks on black or other dark colored cardstock - so elegant!) I cut out the heart, leaving a narrow border around the outer edge. I then applied red sparkles to some of the swirl images inside the heart and attached a piece of knotted cranberry red ribbon to the center with a Glue Dot. I attached the heart embellishment to the front of the card with 3-D dots.

I'll stamp a sentiment on the inside the card once I've decided if it will be used for a Valentine, a wedding or an anniversary.

Thanks for looking! Have a fun and safe weekend!!
Photobucket

Wednesday, January 19, 2011

Recipe of the Week....Mini Meatloaves

This recipe for Mini Meatloaves is super quick to assemble and bakes up really fast. It's a great recipe to use when you've got to get dinner on the table lickety-split for your hungry kiddos or hubby!


You can tweak the recipe to suit your taste, but here is how I make mine:

Ingredients:
  • 1 lb. lean ground beef (I use 93% lean)
  • 1 pkg. dry onion soup mix
  • 1 Tbsp. Worcestershire sauce (which my dad jokingly calls "what's-this-here sauce" - ha!)
  • 2 eggs
  • 1/8 cup milk
  • 1 cup dry oatmeal
  • Salt and pepper to taste
  • Finely shredded cheddar cheese
Method:
Pre-heat oven to 350 degrees. In a large mixing bowl, combine and mix all ingredients, except for cheese. Drop by large, even spoonfuls into 12 muffin cups that have been sprayed with non-stick cooking spray. Top with finely shredded cheddar cheese. Bake for approximately 20 minutes, or until meat is done. Serve with ketchup or Heinz 57 sauce on the side if desired.

These little meat loaves go great with green beans, corn, a salad and/or a baked potato! They also freeze well for lunches!

Have a GREAT day!!
Photobucket

Saturday, January 15, 2011

A Western-Looking Thank You Card...

Here's a western-looking thank you card that I whipped up in a matter of minutes:


I used the CTMH "Weathered Backgrounds" woodgrain stamp to create the barnwood background and the word "THANKS" is from the CTMH "Say it in Style" stamp set. The little star image is from an old CTMH hostess-only stamp. I folded the right edge of the card over and distressed the edge, then glued the edge down. I tied natural hemp through the holes in the little button, fraying the ends, and attached it to the center of the star with a Glue Dot. Jute twine was used to create a lasso which encircles the word "THANKS". The lasso is attached it to the front of the card using Glue Dots.

Thanks for looking! Have a GREAT day!!
Photobucket

Thursday, January 13, 2011

A Special Necklace from My Sweetie...

One of the gifts that my sweetie got me for Christmas this year was a personalized sterling silver necklace from Lisa Leonard Designs. I can't put into words how much I LOVE, LOVE, LOVE her jewelry designs!!! Click HERE to go to her website to check it out! Anyway, here's a photo of the necklace that Mike got for me:


It came in a cute little kraft box all tied up with a sweet robin egg blue colored ribbon - an adorable presentation! (And presentation is everything, right?!?!?) Although you can't see it in this photo, on the back of the silver "family" charm there is a heart...so cute! I love wearing this necklace and hearing the soft tinkling sounds that the charms make when they bump together. Sometimes I wear it alone and I sometimes layer it with a freshwater pearl necklace...either way it's so elegant!

With Valentine's day just around the corner you might want to hint to your sweetie that you'd like something from Lisa Leonard's collection! Also, (a little tip!), when I signed up to get her email updates I was sent a coupon for 15% off of my purchase - SCORE!

Blessings,
Photobucket

Tuesday, January 11, 2011

Recipe of the Week...Never Fail Pot Roast


I LOVE putting a roast in the crock pot before heading out the door for work in the morning! The reward that I get when I return home is a house that smells sooooo delish and an incredible dinner with minimal effort on my part. All I have left to do is whip up some mashed potatoes and gravy and open/season a can of green beans and my family is ready to sit down to one of my favorite meals of all time!

INGREDIENTS:
  • Eye of Round Roast...size depends on how many you have to feed
  • 1 small can of mushrooms, drained (optional)
  • 1 teaspoon garlic powder
  • 1 package dry onion soup mix
  • Salt and pepper to taste
METHOD:
Unwrap roast and rinse off with water. Place in crock pot. Add mushrooms, garlic powder, salt and pepper.

In a jar with a screw-on lid, place 1/4 to 1/3 cup of water and contents from a package of dry onion soup mix. Shake until combined and pour over roast in crock pot.

Place lid on crock pot and cook on low for about 8 hours. Remove roast from crock pot and place on serving plate. Cover roast with foil and allow to "rest" for 10 minutes before slicing.

Make gravy using meat/onion/mushroom drippings from crockpot by placing those ingredients in a sauce pan and gradually adding enough corn starch to thicken the juices to form gravy. Be sure to stir mixture constantly with a whisk while you're thickening it so that it doesn't clump up...if needed you can add a little water too.

Serve with mashed potatoes and veggie of your choice....soooooo delicious!!!

Have a blessed day!
Photobucket

Sunday, January 9, 2011

Our First Snow of the Season...

Just had to share...we're finally getting our first snow of the season here in Broken Arrow, Oklahoma! (Las Vegas got snow before us this year - crazy, eh??) The forecast says we won't get much...probably only an inch today and then 1 - 3 inches are possible tomorrow. Nothing to close school over or anything! Here's a pretty little photo of a snowy corner of my backyard...taken looking out one of my living room windows:


So, I'm spending my afternoon close to the fireplace curled up in a quilt, drinking hot cocoa, and reading my new Country Living magazine! A PERFECT winter day if I do say so myself!

Blessings,
Photobucket

Saturday, January 8, 2011

Tutorial: Altered Square Envelope Scrapbook


Here's a fun envelope scrapbook that I created using 7" x 7" envelopes and the BEAUTIFUL papers from the CTMH "Inspirations" collection. I saw a photo of a similar scrapbook HERE, and I decided that I would create one of my own using CTMH products and share the tutorial with you!

Here's a closed view of the completed scrapbook:


Here's an open view of the inside:


Here's an open view of the backside:


Let's get started so that you can make one of these little gems for yourself or for someone you love!

You'll need three 7" x 7" envelopes. I purchase mine from Envelopes Express where they cost about $.58 each when you order a quantity of 25. (The more you order, though, the cheaper they are). Better yet, the shipping is free!


You need to attach your envelopes together by applying adhesive to 2 of the 3 flaps:


When you're done attaching the envelopes together, the base of your album should look like this:


Fold the scrapbook base like this, which will make it easier to work with:


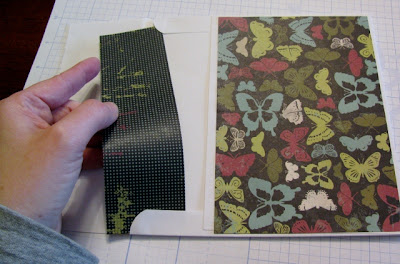
Now to decorate your album! Begin by cutting 3 pieces of decorative paper 4 3/4" wide x 6 3/4" tall. Apply adhesive to the back of the paper and apply to the envelope as shown:


Cut a strip of coordinating decorative paper 2" wide x 6 3/4" long and apply adhesive to the left side of the 6 3/4" side. Attach this to the inside of the envelope, lining up the side with adhesive to the fold where the flap is:


Cut a piece of 6" x 6" piece of Sweet Leaf cardstock and a piece of 6" x 6" black cardstock. Cut a piece of Vineyard Berry grosgrain ribbon to a length of 3". Trim ends and fold into a loop. Lay ribbon centered on the left edge of the Sweet Leaf cardstock. Using a paper piercing tool punch a hole through the ribbon and cardstock:

Place a black brad through the ribbon to secure it to the cardstock:


Place adhesive on the back of the black cardstock. Line up with the Sweet Leaf cardstock that has the ribbon and brad attached, and stick together:


Slide this page into the envelope pocket:


Repeat these steps for the other two envelope pages. You can add photos, quotes or journaling as desired...


Cut a coordinating piece of decorative paper 7" long x 2 3/4" wide. Apply adhesive to the inside of the flap that will become part of your cover, and adhere the paper. Trim the edges if necessary so that the paper is flush with the envelope flap:


Turn the flap over and cut another piece of coordinating decorative paper to fit the front side. Apply a strip of Terrifically Tacky Tape to the envelope flap as shown:


Cut a piece of scrap decorative lace to 7" long and apply to the Terrifically Tacky Tape, making sure that the edge of the lace hangs over the flap of the envelope:


Apply adhesive to the back of the paper you cut to cover the flap and adhere to the flap over the lace:

Now for the embellishments....begin by stamping the letters  L-O-V-E using the CTMH "Baroque Alphabet". I used Vineyard Berry ink on Colonial White cardstock. Cut out the letters, leaving a slight border around each edge, so that each letter measures 1 1/2" square. Ink the edges with black ink to give an aged/distressed look. Cut a piece of coordinating cardstock, (I used CTMH Olive cardstock), 3 1/2" wide x 3 3/4" tall. Using 3-D dots on the back of the letters, apply the letters to the Olive cardstock and set aside:


Apply Vineyard Berry ink to the butterfly image from the CTMH "Find Your Style" stamp set. Using the "second generation" stamping technique, stamp two images onto Colonial White cardstock. Ink just the edges of the butterfly stamp again, and using the "Rock and Roll" stamping technique, align the inked stamp up with the second generation image and apply. Cut out both images. Apply 3-D dots to the back of the second generation image, line up with the first generation image and adhere:


Place 3-D dots on the upper and lower portion of the backside of the Olive cardstock. (Be sure to leave the center open, as you will run a piece of ribbon through the opening later to tie the scrapbook closed).

Attach the L-O-V-E stamped image to the lower two-thirds of the scrapbook cover. Attach the butterfly image above the L-O-V-E image at a slight angle, allowing one of the antenna to hang over the top:


Add a little bling to form the body of your butterfly. Here's what your scrapbook looks like so far, standing up:


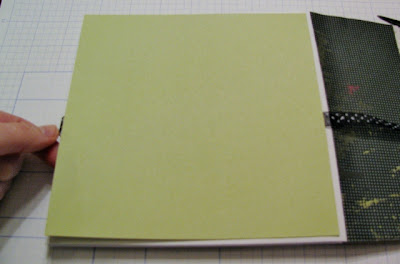
To decorate the backside, start by cutting two pieces of 6 3/4" square pieces of Sweet Leaf cardstock and one piece of 6 3/4" square black cardstock. Cut a piece of black 1/2" polka dot organza ribbon 26" long and trim the ends. Turn your envelope album where the backside is facing up. On the far right envelope attach the organza ribbon to the center using Glue Dots:


 Apply adhesive to the backside of one of the Sweet Leaf squares and apply to the back of the envelope that you just attached the ribbon to:

Attach the black square of cardstock to the center envelope back and the other piece of Sweet Leaf cardstock to the far left envelope back:


 Draw a loose/squiggly black line around the outer edge of the Sweet Leaf square of cardstock that you applied over the ribbon:


 Cut two Vineyard Berry cardstock squares 2 1/2" x 2 1/2". Cut two pieces of decorative paper the same size. Attach to the Sweet Leaf cardstock as shown:


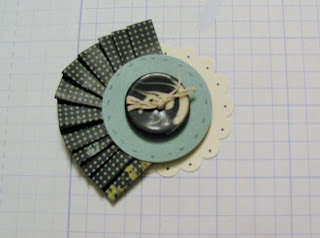
To create the embellishment for the center, using a 1 7/8" scallop punch, punch out element from Colonial White cardstock. Using a 1 1/2" circle punch, punch out element from Juniper cardstock. With a black marker, put a dot of ink on each of the scallops and draw "stitch lines" around the outer edge of the Juniper circle:


 To form the ruffle, cut a strip of decorative paper 7" long x 1" wide:


Starting at one end, fan fold the paper:


Apply adhesive to half of one side of the Juniper circle and then shape/adhere ruffle to the adhesive. Using a 3-D Dot apply the ruffled circle to the center of the Colonial White scallop:


Tie natural hemp through the holes in a coordinating button and attach the button to the Juniper circle with Glue Dots. Apply the embellishment to the center of the scrapbook page, between the squares. Add pictures, journaling or quotes to the squares if desired...


Using Vineyard Berry ink on Colonial White cardstock, stamp border from CTMH "Wings" stamp set and cut out:


Attach cut out to lower portion of black cardstock page and apply bling to cut out border if desired. Cut two 3" lengths of Juniper grosgrain ribbon, tie into knots, and trim ends. Using Glue Dots attach ribbons to the upper right and left corners of the black cardstock page. Add photo to center of page if desired:


Cut out a 4 1/2" square piece of decorative paper and attach to the lower part of the final Sweet Leaf page:


Using Juniper ink on Colonial White cardstock, stamp 2 bird images from the CTMH "Find Your Style" stamp set. Using 3-D dots, follow the same instructions as the butterfly above and layer the images. Attach layered bird embellishment to the upper left hand corner of the page. Cut a 4" piece of Vineyard Berry grosgrain ribbon, trim ends, and apply to page using glue dots. Attach a decorative ribbon knot using a Glue Dot. Apply 3 black buttons, tied with twine or natural hemp, to the lower left corner of page using Glue Dots:


This is what the back side of the scrapbook looks like, standing up:


Following the same stamping method as the butterfly image, stamp two fleur de leis images, (from the CTMH "Wings" stamp set), using Vineyard Berry ink on Colonial White cardstock. Cut out, attach a black brad to the center of the top layer and using a 3-D dot apply the top layer to the bottom layer. Apply adhesive to the back of the embellishment and adhere to the upper part, just above the ribbon, of the front flap on your scrapbook. Run the ribbon under the L-O-V-E embellishment and tie:


Now your book is ready for pictures, journaling, etc.! I hope that this tutorial has been helpful and informative and that you'll be inspired to create some of these fun little scrapbooks too!

On a final note, the FABULOUSY ARTSY Tresa Black is hosting a blog hop/linky party for those of us who have created projects using CTMH "Inspirations" products. (Thanks, Tresa, for hosting this fun hop!) I've linked up my project, so please click HERE to visit Tresa's blog and to check out some AMAZING artwork!

I've also entered this project on this week's "Fabulous Friday Challenge" at Frosted Desgins! Click HERE to check out the AWESOME artwork over there too!!

Happy Scrappin'!

Photobucket