Pages

Tuesday, June 30, 2015

From Spaghetti Sauce Jar to Shabby-Chic Vase...

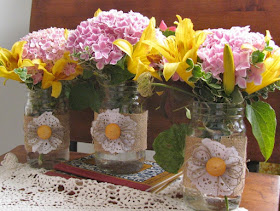
I am a big believer in "nice matters". I think that a little bit of niceness goes a long way in today's harsh and self-centered/self-indulgent society. I love to share the crafty things that I make, yummy things that I bake and produce/flowers from my garden with my friends, so I decided to made these flower arrangements to brighten the desks of the three girls that I work with:


Most people think that you have to spend money to do something nice for someone, but in all honesty, that's just not the case at all. Sadly, most kiddos today think that unless money is spent on them, rather than time, then they aren't "loved". I think that society is failing children by allowing them to believe that money and things equate love. I am very fortunate to have grown up with parents and grandparents who valued time above money, and I have such fond memories of the time and activities that we did together. I am blessed to have been able to pass these values on to my son, and I hope someday to have grandchildren to share these same values with.

Now on to an inexpensive, trash-to-treasure project for you to share with someone in your life!! I think that the vases that I made from washed out spaghetti sauce jars turned out so cute, so I thought that I'd show you how I made them. These come together really fast...the part that takes the longest is waiting for the glue to completely dry. (But if you live in the south like me, pour yourself a nice glass of sweet iced tea and grab a magazine to thumb through while the glue dries - problem solved - lol!)

Begin with empty and clean spaghetti sauce jars. Cut a piece of burlap to fit around the circumference of the jar:


Put a large piece of paper or newspaper down to protect your surface from glue. Squeeze Elmer's glue around the outside of the jar:


Wrap the pieces of burlap around the glue covered areas of the jars, so that the ends slightly overlap. Be sure to secure the overlapped ends with a fine bead of glue, then set jars aside to allow the glue to dry:


While the glue is drying you can make the paper doily flowers to embellish your vases. Begin with a small paper doily as shown:


Fold the doily in half:


Unfold the doily, and fold it in half again in the opposite direction to make an "X" in the center:


Now start scrunching up the doily; folding, creasing, twisting until you've created a flower shape that you're happy with. Remember...there is no right or wrong way to do this, and I think the more scrunchy and wrinkled the flower is, the better it looks!


Use a dot of Elmer's glue to hold down the center of the flower so that it keeps it keeps it shape. Add a nice sized dot of glue to the burlap seam on your jar, and then place your paper doily flower on the glue:


Gather up some fun buttons for the flower centers and some twine to make a fluffy bow for the flower center as well:


You can click HERE to go to the post where I did a tutorial on how to create these simple, fluffy bows. (In the tutorial I used narrow satin ribbon, but you can apply this method to just about any kind of ribbon or twine.)

Once you've created your bows, squirt a good sized glop of glue onto the center of the doily and place the center of the twine bow into the glue:


The buttons that I used had shanks on the back, so using some wire cutters I nipped those off so that my buttons would lie flat. I squirted a large glop of glue onto the knot of the twine bow, and then nestled the button into the glue to create the center of the flower:


Once the glue had completely dried, I put water in the vases and then added cut flowers from my garden. I love the shabby-chic look of these, and I think they would make lovely, low cost table decorations for bridal showers, weddings, receptions, birthdays, or just to give to friends like I did. :)


Take a minute today to do something unexpectedly nice for someone...and remember, nice really does matter!!

Blessings,
Photobucket

Monday, June 29, 2015

Doodle Art


Good morning and happy Monday, friends! As you know, I am a HUGE fan of Stephanie Ackerman, her blog, classes and artwork. I recently signed up for her online Bible Journaling class, and have been working on/practicing my doodling and lettering skills. Today I thought that I'd share one of the "practice pieces" that I created in preparation of beginning to journal in the new ESV wide margin Bible that I just received in the mail:


I kinda like how it turned out, and I appreciate the imperfections of it being a hand-drawn piece. I think the I'll put it in a desk frame to display and encourage myself to practice, practice, practice my doodling an lettering. :)

As silly as it sounds, I've been a little intimidated to actually draw/color in my new Bible...even though that is what I bought it for - lol! I decided to jump into it slowly by using some scripture doodles that I found on Stephanie Ackerman's blog, as well as several that I found on Pinterest. I printed off the examples that I liked and that inspired me, and have been using those as my springboard for my first attempts at journaling and drawing in my new Bible.

If you are new to Bible journaling as I am, and are feeling a bit intimidated to dive into marking/drawing in your Bible, I HIGHLY suggest that you check out Pinterest and the following blogs for some inspiration:
Some of these sites have free printables that you can trace into the margins of your Bible and then color/decorate/embellish any way you choose. This is a great way to ease into incorporating artwork into your daily Bible studies.

I hope this has inspired you to jump into a Bible Journaling class as well! It's a fun new way to experience the word of God and to grow in Him!

Wishing you a blessed week!

Photobucket

Saturday, June 27, 2015

Silly Saturday


Wishing you a fantastic weekend, friends! :)

Photobucket

Thursday, June 25, 2015

Jewelry Organizers

While strolling through Kohl's department store I caught sight of some pretty turquoise blue porcelain egg dishes. I instantly thought "jewelry organizers", and since they were on sale I scooped up 5 of them as well as several little matching turquoise blue Fiesta Ware fruit bowls, which were on sale too!

I've got 2 long, shallow drawers at the top of my dresser, and I knew that all of these pretty dishes and bowls would fit perfectly in them to separate and organize my jewelry. I started out by emptying the contents of the drawers. I then figured out how I wanted to arrange the dishes and bowls, and went to work separating, sorting and organizing my baubles...take a peek at how it looks now:


I LOVE, LOVE, LOVE how well these keep my pretties sorted and in place...and they are lovely to look at when the drawers are opened! If you wanted more of a shabby chic look, you could scour thrift stores for mismatched saucers, trays, etc. to organize your jewelry. Think how pretty a platter with some of your favorite bead necklaces would look displayed on top of your dresser...a practical and pretty piece to organize and dress up your space!

Enjoy the rest of your week and have a FANTASTIC weekend, friends!!

Photobucket

Monday, June 22, 2015

Flowers From My Garden and a Doodle Art Tag...

Good evening! We had a nice, sunny weekend here in Oklahoma and my flowers are LOVING all of the sunshine! My sweet friend Megan F. has been a little stressed out lately with lots of last-minute family activities, so I decided to cut some of the pretty flowers from my backyard gardens and make a bouquet for her:


I also doodled the cute tag that I tied onto the vase that I placed the bouquet in. Megan is such a kind and giving person, always going the extra mile for everyone else and putting herself on the back burner, so I wanted to let her know that she is loved and appreciated and put a smile on her face. :)

I'm currently working on several projects, one of those being a memory box project for a friend that recently had her first grandchild, so I'll be sharing those with you in the near future. I also finished reading two more Philippa Gregory novels about the Tudors, (I'm REALLY ADDICTITED to her novels!!!), so I'll be sharing book reviews with you very soon, too.

Wishing you a blessed week!

Photobucket

Sunday, June 21, 2015

Quote Sunday: Happy Father's Day!


Happy Father's Day to all of the dads out there!! Have a WONDERFUL day!
Photobucket

Saturday, June 20, 2015

Silly Saturday


This is perfect for all the daddy's out there who struggle with dressing a baby - ha! ha! Have a great weekend!!  
Photobucket

Monday, June 15, 2015

Sneak Peek: My Americana Lap Quilt in the Making

Good morning, friends! I hope that you had a nice weekend! On Saturday morning I met up with my sweet friend Robbi R. for breakfast at Panera, and we had a great time catching up on the goings-on of our lives. After leaving Panera I ran a few errands and then headed home for a peaceful afternoon nap snuggled up with my sweet little dog, Tony. :)

A while back I started making a lap quilt in Americana colors, so I thought I'd show you the blocks that I hand-stitched for the quilt:

Lemoyne Star:


Applique Rose:


Ohio Star:


Hearts 'A Bloom:


To see what the quilt will look like when it's all put together, I laid out the blocks and their adjoining pieces on a throw on my guest bed and took a photo:


My sweet sister-in-law Sandy, who is an AMAZING quilter, has agreed to finish/machine quilt it for me! She worked on it this past Saturday and got the top all sewn together, so now she'll machine quilt it for me. I am super excited to see it all finished up, so be sure to stay-tuned and I'll show you the completed lap quilt in the near future!

Thanks for dropping by today!! Have a SUPER week!

Photobucket

Saturday, June 13, 2015

Silly Saturday


Hee! Hee! Have a FANTASTIC weekend!!


Photobucket

Thursday, June 11, 2015

"Barn in the Meadow" Painting...

Good evening! This week has just flown by for me...I can hardly believe that tomorrow is Friday! A couple of weeks ago I attended another painting class with my sweet friend Sharon S., her daughter Sara, and Sara's boyfriend Ryan, so I thought I'd share a couple of photos with you of our class:


We had a great time and the instructor was really funny. The painting that we did was called "Barn in the Meadow", and here is my finished painting:


My son Justin has called "dibs" on it, so I'm going to have it framed in a barnwood frame and give it to him to hang in his home.

Thanks for dropping by today...enjoy your Friday!


Photobucket

Monday, June 8, 2015

Recipe of the Week: Fresh Blackberry Cobbler

Hello friends! I hope that the beginning of your week has started out fantastic! I am super excited to show you the first batch of blackberries that I picked from my little garden on Saturday:


Aren't they beautiful? They are HUGE too...most of them are the size of the end of my thumb! (Not saying that I have huge thumbs - LOL! - but that berries the size of the end of my thumb are huge!)

I decided that these lovelies should be made into a delicious cobbler and bowled up with some vanilla ice cream, and I knew you'd want the recipe! :)


I wanted a quick cobbler recipe, so I did a Google search and found one at allrecipes.com that fit the bill nicely! Here's the recipe that I used:

INGREDIENTS:
  • 2 cups blackberries, rinsed and patted dry
  • 1/2 cup butter, melted
  • 1 cup white sugar
  • 1 cup self-rising flour
  • 3/4 cup milk
METHOD:
Preheat oven to 350 degrees. Melt butter in an 8" x 8" glass baking dish. In a medium mixing bowl, combine sugar, flour and milk, stirring until mixed. Pour batter over the top of the butter in the baking dish. Place berries on top of the batter and bake for 35 to 40 minutes or until top is lightly browned. Serve warm with vanilla ice cream and store any leftovers covered in the refrigerator.

Have a great week!

Blessings,
Photobucket

Saturday, June 6, 2015

Silly Saturday


Have a fun weekend, friends!! :)

Photobucket

Thursday, June 4, 2015

Simple, Sweet Baby Card

Hi, friends! I hope your week is going well. We're finally getting a rain-free week with lots of sunshine here in Oklahoma...it seems like it's been sooooo long since we've had some sunny days!

Today I wanted to share a simple, sweet baby card that I recently made to accompany a gift for a friend who just had a precious baby girl. I used some pink parchment cardstock and a foot punch to create the little pink feet. I sponged the outer edges of the feet with a slightly darker shade of pink ink to add a little dimension, and then adhered 3-D dots to the back of the feet before attaching them to the card:


I also sponged the outer edges of the card with the same pink ink, and added a coordinating ribbon to pull everything together.

Thanks for stopping by today!

Photobucket