Sunday, May 29, 2011
Quote Sunday
There's a place that I travel
When I want to roam,
And nobody knows it but me.
The roads don't go there
And the signs stay home,
And nobody knows it but me.
It's far, far away
And way, way afar,
Over the moon and the sea.
And wherever you're going,
That's wherever you are,
And nobody knows it but me.
~Old Chevrolet Advertisement...Author Unknown
Thursday, May 26, 2011
Recipe of the Week..."Spicy Ranch Snack Crackers"
My friend and co-worker, Lesda, shared the recipe with me for these incredible and VERY addictive snack crackers. They really hit the spot when you need something salty/spicy/crunchy to snack on and they are really quick and inexpensive to make too!
Ingredients:
- 1 1/3 cups vegetable oil
- 2 Tablespoons dried red pepper flakes
- 1 package dry Hidden Valley Ranch dressing mix
- 1 package, (4 sleeves), wheat saltine crackers
Combine vegetable oil, pepper flakes and dressing mix in a large glass measuring cup and whisk until blended. Unwrap crackers and place them in a large baking pan. Pour oil mixture over crackers and gently stir every 15 minutes for about an hour until crackers are thoroughly coated and there is no more oily mixture in the bottom of the pan. Store in an airtight container. DELICIOUS!! (P.S. - Warning! You won't be able to eat just one of these crackers - hee! hee!)
Wishing you a happy day,
Wednesday, May 25, 2011
Yippee!! Blog Candy for Me!
What a fun surprise it was to find out that I'd won some terrific, crafty blog candy from my blog buddy, Stacie!! (Check out her wonderful blog HERE). I received all of the goodies shown above in the mail last Friday...it was a fantastic way to end the week!! Thanks, Stacie for your generosity...you're a peach!
Also, I found out today that I'd won the fabulous patriotic blog candy shown below from Kimberly at Scrap It Girl...click HERE to check out her awesome blog. Thanks, Kimberly - you made my day!
Blessings,
Monday, May 23, 2011
A Little Pocket "Get Well Soon" Card and Bookmark...
My friend and co-worker, Sherri L., recently had knee surgery and has been home recuperating for the past couple of weeks. (If you remember, Sherri gave me the recipe for the Miraculous Moisturizing Cream...click HERE for the recipe if you missed it). Anyhoo, I made a cute little card and bookmark for Sherri to cheer her up while she's home recuperating. I used the following Close to My Heart products for this card:
Here's the inside of the card:
And here's a close-up photo of the bookmark:
Thanks for looking...have a great day!
- Rustic Alphabet Stamp Set #E1002
- Playful Flourishes Stamp Set (discontinued, but the Cherished Flourishes Stamp Set #D1413 could be used instead)
- Card Chatter Sympathy Stamp Set #D1476
- Wings Level II Paper Packet #X7135B
- Buttercup Yellow Cardstock #1271
- Garden Green Cardstock #1244
- White Daisy Cardstock #1385
- Black Cardstock #1386
- Sweet Leaf Stamp Pad #Z2153
- Juniper Stamp Pad #Z2165
- Black Stamp Pad #Z2105
- Burgandy grosgrain ribbon
- Green satin ribbon
- Fiskars paper crimper
- 1 7/8" scallop circle paper punch
Here's the inside of the card:
And here's a close-up photo of the bookmark:
Thanks for looking...have a great day!
Sunday, May 22, 2011
Saturday, May 21, 2011
Recipe of the Week...Gram's Hummingbird Nectar
As a little girl growing up in the country and living next door to my grandparents, I have fond memories of my grandma making hummingbird nectar to feed the hummingbirds that would flock to her feeders. She, my granddaddy and I would sit outside in metal lawn chairs under one of their huge oak trees and watch the hummingbirds feed and dive-bomb each other in rivalry over the sweet nectar that she would make. (Gosh, I miss my grandparents so much!) Since the temperature here is now warm enough to hang a feeder on my patio, I thought I would share my grandmother's recipe with you for hummingbird nectar:
Ingredients:
- 2 cups white granulated sugar
- 8 cups water
- 12 drops red food coloring (optional)
In a large pot bring sugar and water to a rolling boil, stirring to dissolve sugar. Add red food coloring to mixture if desired. Allow nectar to cool and then pour into hummingbird feeder. Store any leftover nectar in the refrigerator.
Enjoy the day!
Wednesday, May 18, 2011
Sour Cream Container Gift Packaging Tutorial
Although these adorable sour cream-style containers for gift packaging have been around for awhile, I thought I'd share my version and a tutorial with you. They make perfect little packages for small gifts like candy and jewelry, and they sky's the limit when it comes to decorating them...here's the version that I created and included in the Secretary's Day gift baskets that I made a couple of weeks ago:
You can get 4 sour cream-style packages from one sheet of 8 1/2" x 11" piece of cardstock or decorative paper. Here's how they're made:
Materials:
Apply Teriffically Tacky Tape to 3 edges as shown:
Roll cardstock or paper into a tube shape so that adhesive on the short end overlaps and sticks to adjacent short end:
Pinch one end together so that adhesive sticks together:
Add candy, (or other small gift!), through the open end. Container can hold 3 or 4 mini candy bars...
Press end in the opposite direction of the first end, as shown in the next photos, to allow adhesive to stick to itself and seal the container:
Using a paper crimper, carefully crimp the ends of each container:
Punch out paper flowers and thread buttons with CTMH waxy flax:
Attach threaded buttons to paper flowers with CTMH Liquid Glass and set aside to dry:
Cut ric-rack or ribbon into lengths to fit the perimeter of each container and attach using Glue-Dots:
To cover the ric-rack seam, attach each paper flower to the container using CTMH Liquid Glass:
Now your sour cream gift containers are ready to give away!
If you would like to order Liquid Glass, Waxy Flax, (which comes in many colors!), or any other of the terrific products that Close to My Heart offers, please click on my CTMH shopping cart located in the upper right corner in the side bar of my blog. Your order will be shipped directly to your door in 2 - 5 days!
Have a blessed day!
You can get 4 sour cream-style packages from one sheet of 8 1/2" x 11" piece of cardstock or decorative paper. Here's how they're made:
Materials:
- 1 sheet 8 1/2" x 11" cardstock or decorative paper
- Teriffically Tacky Tape
- Ric-Rac or Ribbon
- Paper or felt flowers
- Buttons
- Glue Dots
- CTMH Liquid Glass
- CTMH Waxy Flax in Bamboo
- Fiskars paper crimper
- Candy
Apply Teriffically Tacky Tape to 3 edges as shown:
Roll cardstock or paper into a tube shape so that adhesive on the short end overlaps and sticks to adjacent short end:
Pinch one end together so that adhesive sticks together:
Add candy, (or other small gift!), through the open end. Container can hold 3 or 4 mini candy bars...
Press end in the opposite direction of the first end, as shown in the next photos, to allow adhesive to stick to itself and seal the container:
Using a paper crimper, carefully crimp the ends of each container:
Punch out paper flowers and thread buttons with CTMH waxy flax:
Attach threaded buttons to paper flowers with CTMH Liquid Glass and set aside to dry:
Cut ric-rack or ribbon into lengths to fit the perimeter of each container and attach using Glue-Dots:
To cover the ric-rack seam, attach each paper flower to the container using CTMH Liquid Glass:
Now your sour cream gift containers are ready to give away!
If you would like to order Liquid Glass, Waxy Flax, (which comes in many colors!), or any other of the terrific products that Close to My Heart offers, please click on my CTMH shopping cart located in the upper right corner in the side bar of my blog. Your order will be shipped directly to your door in 2 - 5 days!
Have a blessed day!
Monday, May 16, 2011
Look at What my Sister-in-Law Made for Me!!
This weekend my sister-in-law Sandy presented me with an amazing gift that she made just for me:
Isn't that a GORGEOUS purse?!?!? Check out the inside, complete with terrific pockets:
Don't you just love it?? I was so thrilled to receive such a pretty purse! Sandy has become quite the seamstress, hasn't she? (She is even going to make me matching make-up bags to go with the purse - yippee!!) As soon as I got home I emptied the purse I was carrying and put everything into my new purse! I love, love, love it! (Thanks, Sandy...you are the BEST!!)
Have a WONDERFUL week!
Blessings,
Sunday, May 15, 2011
Friday, May 13, 2011
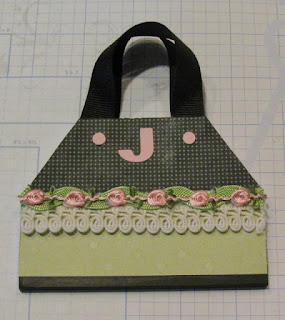
Re-Post! Altered Mini Composition Book "Purse" Tutorial
Something happened with Blogger and my first post of this tutorial was lost...along with the comments - UGH! Anyhoo...here it is again! Glad that blogger is up and running again!
Awhile back I was checking out some other crafty blogs and stumbled across a cute idea HERE, which shows mini composition books that have been altered to look like little purses. I decided that I would make some of these cuties to go in the Secretary's Day gift baskets that I created. I also made some for my friends Jamie and Carol, and one for my Thirty-One purse consultant Julia. I made them using mini composition notebooks that I picked up at Dollar General. There were 3 notebooks in each package and each package only cost $1.00!
Begin by cutting the top corner off of the notebook at angle. Cut the notebook paper and back cover at the same angle. (I actually cut all of the angled corners on the notebooks while sitting in my easy chair watching TV!)
Using the corner that you cut from the cover of the notebook as a guide, trace the angle on the opposite side of the cover so that your angles will match:
Cut the notebook paper and back cover to match this angle as well so that your notebook looks like this:
Cut 2 pieces of patterned paper the same size as the front and back covers of your notebook. Cut 2 pieces of ribbon to form the handle loops:
Attach a Glue Dot to each end of the ribbon and attach ribbons to the front and back covers of the notebook to form the purse handles:
Apply adhesive to the back of each piece of decorative paper. I ran my paper through my Xyron adhesive machine so that they would be evenly coated with adhesive. Attach the paper to the front and back covers of the notebook and trim the edges:
Apply a line of Teriffically Tacky Tape across the front cover and attach decorative trim:
Cut out monogram letters, (I used my Cricut for this), and attach to the upper part of the cover, centering letters between the ribbon handles:
Punch small dots from paper and attach with Glue Dots to cover on either side of the monogram letters:
If desired, paper dots may also be attached to the back cover in the same location to give a uniform look to the purse.
For a varied look, purses may also be created using contrasting papers on the covers - this is a great way to use up scrap strips of paper!
Here are a few other "purse designs" that I created:
These are so quick and fun to make and are super little gifts to brighten any gals day! I hope this tutorial was helpful and you enjoy making these as much as I did. I'd love to see your purse creations too, so please feel free to email me photos if you'd like!
Have a wonderful day!
Subscribe to:
Posts (Atom)