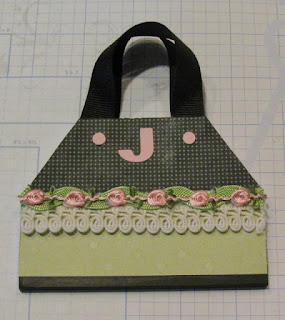
Something happened with Blogger and my first post of this tutorial was lost...along with the comments - UGH! Anyhoo...here it is again! Glad that blogger is up and running again!
Awhile back I was checking out some other crafty blogs and stumbled across a cute idea HERE, which shows mini composition books that have been altered to look like little purses. I decided that I would make some of these cuties to go in the Secretary's Day gift baskets that I created. I also made some for my friends Jamie and Carol, and one for my Thirty-One purse consultant Julia. I made them using mini composition notebooks that I picked up at Dollar General. There were 3 notebooks in each package and each package only cost $1.00!
Begin by cutting the top corner off of the notebook at angle. Cut the notebook paper and back cover at the same angle. (I actually cut all of the angled corners on the notebooks while sitting in my easy chair watching TV!)
Using the corner that you cut from the cover of the notebook as a guide, trace the angle on the opposite side of the cover so that your angles will match:
Cut the notebook paper and back cover to match this angle as well so that your notebook looks like this:
Cut 2 pieces of patterned paper the same size as the front and back covers of your notebook. Cut 2 pieces of ribbon to form the handle loops:
Attach a Glue Dot to each end of the ribbon and attach ribbons to the front and back covers of the notebook to form the purse handles:
Apply adhesive to the back of each piece of decorative paper. I ran my paper through my Xyron adhesive machine so that they would be evenly coated with adhesive. Attach the paper to the front and back covers of the notebook and trim the edges:
Apply a line of Teriffically Tacky Tape across the front cover and attach decorative trim:
Cut out monogram letters, (I used my Cricut for this), and attach to the upper part of the cover, centering letters between the ribbon handles:
Punch small dots from paper and attach with Glue Dots to cover on either side of the monogram letters:
If desired, paper dots may also be attached to the back cover in the same location to give a uniform look to the purse.
For a varied look, purses may also be created using contrasting papers on the covers - this is a great way to use up scrap strips of paper!
Here are a few other "purse designs" that I created:
These are so quick and fun to make and are super little gifts to brighten any gals day! I hope this tutorial was helpful and you enjoy making these as much as I did. I'd love to see your purse creations too, so please feel free to email me photos if you'd like!
Have a wonderful day!


Adorable! Such a great gift idea!
ReplyDeleteOH MY GOODNESS!! I love these! They look gorgeous and even better that they can be used for note taking!
ReplyDeleteWhat a fantastic idea.....great tutorial too. I am visiting from over Stacie's way.
ReplyDeleteLove this idea going to create some tonight!! Your very talented. Thanks for sharing.
ReplyDeleteThanks and I have a keen offer you: How Much Is A Complete House Renovation split level house renovation
ReplyDeleteRespect and I have a tremendous offer: Whole House Renovation Cost Calculator Canada house to renovate
ReplyDeleteThese are so cute! Will try making some!
ReplyDelete