Monday, October 18, 2010

Altered Clipboard Message Center Tutorial


This week our office building is hosting a silent auction of crafts, baked goods, etc. with the proceeds going to the United Way. I made the altered clipboard shown in the photo above to donate for the auction. It's a really easy project, and I thought you might like to make one too, so here's a step-by-step tutorial on how I created this cutie:

Start with a standard clipboard that you can find at any office supply store...I found mine at the local grocery store, of all places!

Cut a piece of decorative paper 1" shorter than length of the clipboard. Leave a slight overage of paper on the sides of the clipboard, as you'll sand and ink the edges to give your clipboard a distressed look:

Measure the height and width of the clip and draw that measurement on the back of the paper:

Cut out the area for the clip and set the scrap of paper aside as you'll use it later for the coordinating ink pen:
Next, cover your clipboard completely with a glue stick...you will probably use about all of the glue stick for this. (NOTE: I prefer using a glue stick for this, rather than another type of adhesive, because the glue stick allows me a little "play" to slide the paper around and make adjustments when I'm adhering the paper to the clipboard.
Adhere the paper to the clipboard, smoothing out any air bubbles as you go:

Cut a piece of coordinating paper about 1 1/2" high and just a little wider than the clipboard. (Remember, later you'll be sanding and inking the edges of the clipboard to distress it). Using a little more glue stick, adhere the strip of paper, slightly overlapping over the paper that you've already adhered to the clipboard.

Set the clipboard aside to allow the glue to thoroughly dry. In the meantime, stamp the flower images that you'll be using to make decorative push pins and a clip. I used the CTMH "Cottage Floral" stamp set, which will be retired at the end of the year.

I stamped double images of the yellow flowers since I will be layering them to add dimension. Using a paper piercing tool, punch a hole through the center of each flower and then cut all of the flowers out using micro-tipped scissors.


Using your fingers, curl the flower petals to add dimension. Layer the 3 flowers as shown in the photo below and place a brad through the center of each to secure.


Stamp a flower and leaf motif on each page of a 3" x 3" Post-It note pad.

Place Terrifically Tacky Tape on the back of the Post-It pad as shown:

Cut two pieces of coordinating cardstock, (I used green and purple), on the clipboard. The green cardstock is cut 4 1/2" tall x 4" wide and the purple cardstock is cut 3 1/2" tall x 3 1/2" wide. 
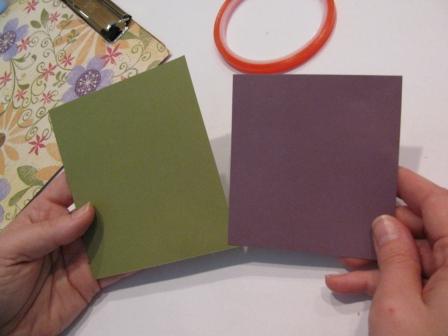
Adhere the purple cardstock on top of the green cardstock and adhere. (NOTE: There will be a taller green border at the top because that will go under the clip).
Attach the Post-It pad to the purple cardstock

Apply Terrifically Tacky Tape to the top and bottom on the backside of the green cardstock and set aside.
Using a sanding block, sand all of the edges of the paper you've adhered to the clipboard, then rub a chocolate brown ink pad around the edges to distress it even further.
Attach the cardstock with the Post-It pad under the clip:
Cut a piece of cork sheeting, (which I purchased at our local hardware store), 5" x 6" and stamp with desired image. (I used the CTMH "Playful Flourishes" stamp set, which will also be retired at the end of the year). Apply a generous amount of Liquid Glass to the back of the stamped cork and adhere to the lower section of the clipboard as shown .

Set several veggie cans on top of the cork for about 15 minutes to ensure that it is securely attached to the clipboard:

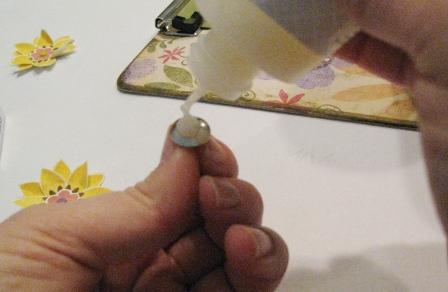
While you're waiting for the cork to dry, apply Liquid Glass to two thumb tacks and adhere a flower to each one. Set aside to dry for about 30 minutes.

Cut a small strip of coordinating paper and attach to the top of a clothespin using a glue stick. When dry, sand edges to distress.


Apply Liquid Glass to the back and attach to the clipboard, to the right of the Post-It pad.


Apply Liquid Glass to the back of the third flower and attach to the top of the clothespin. Let this dry throughly before using clip.


To create the coordinating ink pen, remove the ink cartridge from the pen casing. (I used a Pentel gel pen).

Tie an 8" piece of ribbon to the pen clip on the lid. Trim the scrap piece of paper, (which is the remnant leftover from when you cut out the area for the clipboard clip), to fit the length inside the pen casing.

Tightly roll the paper around the ink casing:

Slide the paper wrapped ink cartridge back into the pen casing and screw the end cap back on to complete your coordinating pen.

Tie multiple types/textures/colors of ribbon to the clip, attaching the tail of the ribbon holding the pen on the left side of the clip:
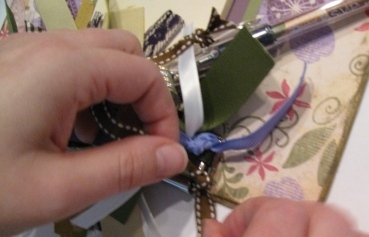
Here's a close-up of the ribbon tied clip:

Attach your push pins to the cork and your altered clipboard is complete!


I hope that you've enjoyed this tutorial. I'd LOVE to see the clipboards that you make, so please send me an email with photos of your artwork!

Happy Scrappin'!!
Photobucket

Sunday, October 17, 2010

Finally - A Relaxing Weekend...

Mike and Justin went camping in the Kiamichi Mountains this weekend with Mike's dad, Logan, so I've enjoyed some quiet time to myself with just Hunter, our beagle, as my sidekick! (The guys made it back home a little bit ago, and thoroughly enjoyed their "man weekend"!)

I spent Saturday teaching an altered tins workshop...I'll be posting tutorials for these projects in the near future, but here are a couple of photos of the projects we made:


This morning I decided to skip church and sleep in...it was so nice to catch some extra ZZZZZ's! The cool morning air felt so nice that I opened up the back door to let some fresh air in. I enjoyed a peaceful morning in the kitchen whipping up some new recipes to share with you in the upcoming weeks. As you can see in the following pictures, Hunter was enjoying a lazy morning too by napping in the grass in the warm sun:


I'm really glad that my fellas are home! They have such a good time camping with Logan, and I do enjoy the quiet time, but I really miss them when they're gone...even though they bring me a mountain of laundry when they return - ha! ha!

Wishing you a WONDERFUL week ahead!!
Photobucket

Thursday, October 14, 2010

Recipe of the Week...Struesel Topped Peanut Butter Chip Banana Cake

This week I tested a new recipe out on Mike and Justin and, since they both really liked this cake, I thought I'd share the recipe with you! (They're really good sports to be my "guinea pigs" when I'm experimenting with new recipes! I know that they'll ALWAYS give me an honest opinion too - ha! ha!)


Cake Ingredients:
  • 2 cups all purpose flour
  • 1 1/2 cups sugar
  • 1 1/2 teaspoons baking powder
  • 3/4 teaspoon baking soda
  • 3 ripe bananas, mashed
  • 1/2 cup buttermilk
  • 1/2 cup margarine
  • 2 eggs
  • 1 teaspoon vanilla
  • 1/2 cup peanut butter flavored chips
Method:
Combine all ingredients in a large mixing bowl and beat with an electric mixer until all ingredients are combined. Pour batter into a greased 9" x 13" cake pan. Add struesel topping, (recipe below), and bake at 350 degrees for 30 to 35 minutes or until cake tester comes out clean.

Struesel Topping:
  • 1/2 cup quick oats
  • 1/2 cup brown sugar
  • 1/2 cup chopped pecans
  • 2 Tablespoons flour
  • 2 Tablespoons margarine, softened
Mix ingredients until crumbly. Sprinkle over top of cake before baking.

This cake can be served warm or cold...it's moist and delicious either way! Enjoy!

Have a blessed day!
Photobucket

Wednesday, October 13, 2010

Just What I've Been Looking For...A Decorative Fall Platter!

After work this evening I stopped off at Marshall's to check out their fall decorations. While browsing around I spotted this beautiful platter and it was only $3.99 - SCORE!


It's just what I've been looking for to put on the baker's rack in my dining area, and looks fantastic with my other fall decorations!

Gotta run for now...I've got chili cooking for dinner tonight!

Photobucket

Sunday, October 10, 2010

A Cute Fall Floral Arrangement and a "Blogtoberfest" hop...

It's hard to believe that it's already Sunday night...this weekend has flown by! I've been busy all weekend working in the yard with Mike as well as getting ready for a workshop that I'm hosting next weekend. (I'll post photos and tutorials of those projects for you soon!)

One of the projects that I worked on this weekend was a floral arrangement that I made as a house warming gift for one of my new co-workers who recently bought a home. She moved here from Texas to work as a school psychometrist for our district. Her husband is still in Texas finishing seminary, and will be moving here later this month. I think the arrangement turned out pretty cute and I hope that she likes it:


I love the way that the orange mums "pop" against the color of the blue tin! I couldn't resist adding the adorable little scarecrow couple...they gave the arrangement a fun touch as well as some height.

I also want to share with you a fun blog tour sponsored by Tresa Black, (a.k.a. The Stamp Goddess). It's called "BLOGTOBERFEST" and you can click on the button below to tour some awesome blogs that have registered to participate. If you've got a blog, be sure visit Tresa's blog and sign up to participate in "BLOGTOBERFEST" too!


Photobucket
 
Wishing you a blessed week ahead!

Photobucket

Saturday, October 9, 2010

Recipe of the Week...Oven Stew


Happy Saturday! I'm so glad that the weekend is FINALLY here...how about you?!?! I'm a little behind in posting my "Recipe of the Week" column this week - sorry! The recipe I'm sharing with you today is a great one to make on the weekend, though, since it bakes in the oven for several hours...so you can clean the house, work in the yard or on craft projects while your dinner is baking without any effort on your part! How fabulous is that?? Mike and Justin really love this hearty stew! Here's the recipe:

INGREDIENTS:
  • 6 or 7 medium sized Idaho potatoes, peeled and cubed
  • 2 cans cream of mushroom soup
  • 1 small onion, finely chopped
  • 1 can green beans
  • 1 can corn
  • 1 can peas
  • 1 large carrot, diced
  • 1 or 2 stalks of chopped celery, if desired
  • stew meat
  • dried parsley - about a Tablespoon
  • garlic powder to taste
  • salt and freshly ground pepper to taste
Method:
In a skillet, cook stew meat with chopped onion until onion is clear and stew meat is no longer pink. Spray a 4 1/2 quart pot or Dutch oven with non-stick cooking spray. Add all ingredients to the pot and stir to combine. Place lid on pot and bake in a 300 degree oven for about 5 hours, or until potatoes are fork tender. Serve with a salad and hot rolls - DELICIOUS! Leftovers, (if you're lucky enough to have any - ha! ha!), can be stored in the fridge to pack in a lunch or two during the week.

TIP: If you like a thicker stew, you can drain some of the juices from the canned veggies before adding them to the pot.

Have a fun and safe weekend!
Photobucket

Wednesday, October 6, 2010

Scrapbook Page of the Week...Frosted Designs Challenge: Book Inspiration

This weeks fun challenge over at the Frosted Designs blog is to create a project inspired by a book!

In the spring of 2005, when Justin got his driver's permit, I created a scrapbook page highlighting this right-of-passage. I used the following excerpt from the Dr. Seuss book Oh the Places You'll Go! as part of the journaling on the page, which was a perfect choice for this achievement:

"Congratulations! Today is your day, you're off to great places! You're off and away! You have brains in your head; you have feet in your shoes; you can steer yourself any direction you choose. You're on your own and you know what you know, and YOU are the guy who'll decide where to go! You'll look up and down streets; look 'em over with care; about some you will say, "I don't choose to go there". With your head full of brains and your shoes full of feet, you're too smart to go down any not-so-good street!"

Here's the finished page, featuring paper that has a road and sight-seeing design and includes a scanned copy of his driver's permit:

It was a quick and easy page to put together and didn't require a lot of extra embellishments because the design of the paper was detailed enough to stand on its own. I did use red, yellow and green brads, though, to simulate the colors of a traffic light.

I hope that this has inspired you to use a quote or excerpt from a book on your own scrapbook pages! Just the right phrase can add the wittiness that an ordinary page needs to become extra special! Be sure to check out some of the other book inspired pages over at Frosted Design!

Happy Scrappin'!
Photobucket