Wednesday, May 18, 2011

Sour Cream Container Gift Packaging Tutorial

Although these adorable sour cream-style containers for gift packaging have been around for awhile, I thought I'd share my version and a tutorial with you. They make perfect little packages for small gifts like candy and jewelry, and they sky's the limit when it comes to decorating them...here's the version that I created and included in the Secretary's Day gift baskets that I made a couple of weeks ago:


You can get 4 sour cream-style packages from one sheet of 8 1/2" x 11" piece of cardstock or decorative paper. Here's how they're made:

Materials:
  • 1 sheet 8 1/2" x 11" cardstock or decorative paper
  • Teriffically Tacky Tape
  • Ric-Rac or Ribbon
  • Paper or felt flowers
  • Buttons
  • Glue Dots
  • CTMH Liquid Glass
  • CTMH Waxy Flax in Bamboo
  • Fiskars paper crimper
  • Candy
Begin by cutting cardstock or decorative paper into four pieces measuring 4 1/4" x 5 1/2". (I used double sided print cardstock).


Apply Teriffically Tacky Tape to 3 edges as shown:


Roll cardstock or paper into a tube shape so that adhesive on the short end overlaps and sticks to adjacent short end:


Pinch one end together so that adhesive sticks together:


Add candy, (or other small gift!), through the open end. Container can hold 3 or 4 mini candy bars...


Press end in the opposite direction of the first end, as shown in the next photos, to allow adhesive to stick to itself and seal the container:


Using a paper crimper, carefully crimp the ends of each container:


Punch out paper flowers and thread buttons with CTMH waxy flax:


Attach threaded buttons to paper flowers with CTMH Liquid Glass and set aside to dry:


Cut ric-rack or ribbon into lengths to fit the perimeter of each container and attach using Glue-Dots:


 To cover the ric-rack seam, attach each paper flower to the container using CTMH Liquid Glass:


Now your sour cream gift containers are ready to give away!

If you would like to order Liquid Glass, Waxy Flax, (which comes in many colors!), or any other of the terrific products that Close to My Heart offers, please click on my CTMH shopping cart located in the upper right corner in the side bar of my blog. Your order will be shipped directly to your door in 2 - 5 days!

Have a blessed day!
Photobucket

Monday, May 16, 2011

Look at What my Sister-in-Law Made for Me!!

This weekend my sister-in-law Sandy presented me with an amazing gift that she made just for me:


Isn't that a GORGEOUS purse?!?!? Check out the inside, complete with terrific pockets:


Don't you just love it?? I was so thrilled to receive such a pretty purse! Sandy has become quite the seamstress, hasn't she? (She is even going to make me matching make-up bags to go with the purse - yippee!!) As soon as I got home I emptied the purse I was carrying and put everything into my new purse! I love, love, love it! (Thanks, Sandy...you are the BEST!!)

Have a WONDERFUL week!

Blessings,
Photobucket

Sunday, May 15, 2011

Quote Sunday


"In the end, what affects your life most deeply are things too simple to talk about". ~Nell Blaine

Photobucket

Friday, May 13, 2011

Re-Post! Altered Mini Composition Book "Purse" Tutorial

Something happened with Blogger and my first post of this tutorial was lost...along with the comments - UGH! Anyhoo...here it is again! Glad that blogger is up and running again!


Awhile back I was checking out some other crafty blogs and stumbled across a cute idea HERE, which shows mini composition books that have been altered to look like little purses. I decided that I would make some of these cuties to go in the Secretary's Day gift baskets that I created. I also made some for my friends Jamie and Carol, and one for my Thirty-One purse consultant Julia. I made them using mini composition notebooks that I picked up at Dollar General. There were 3 notebooks in each package and each package only cost $1.00!

Begin by cutting the top corner off of the notebook at angle. Cut the notebook paper and back cover at the same angle. (I actually cut all of the angled corners on the notebooks while sitting in my easy chair watching TV!)


Using the corner that you cut from the cover of the notebook as a guide, trace the angle on the opposite side of the cover so that your angles will match:


Cut the notebook paper and back cover to match this angle as well so that your notebook looks like this:


Cut 2 pieces of patterned paper the same size as the front and back covers of your notebook. Cut 2 pieces of ribbon to form the handle loops:


Attach a Glue Dot to each end of the ribbon and attach ribbons to the front and back covers of the notebook to form the purse handles:


Apply adhesive to the back of each piece of decorative paper. I ran my paper through my Xyron adhesive machine so that they would be evenly coated with adhesive. Attach the paper to the front and back covers of the notebook and trim the edges:


Apply a line of Teriffically Tacky Tape across the front cover and attach decorative trim:


Cut out monogram letters, (I used my Cricut for this), and attach to the upper part of the cover, centering letters between the ribbon handles:


Punch small dots from paper and attach with Glue Dots to cover on either side of the monogram letters:

If desired, paper dots may also be attached to the back cover in the same location to give a uniform look to the purse.

For a varied look, purses may also be created using contrasting papers on the covers - this is a great way to use up scrap strips of paper!


 Here are a few other "purse designs" that I created:


These are so quick and fun to make and are super little gifts to brighten any gals day! I hope this tutorial was helpful and you enjoy making these as much as I did. I'd love to see your purse creations too, so please feel free to email me photos if you'd like!

Have a wonderful day!

Photobucket

Monday, May 9, 2011

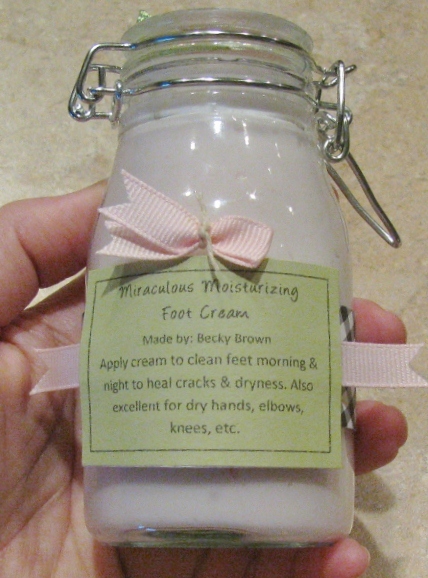
Recipe of the Week..."Miraculous Moisturizing Foot Cream"


Just in time for sandal season here's the recipe given to me by my friend Sherri L. for "Miraculous Moisturizing Foot Cream". This formula works absolute wonders on not only dry, cracked feet but also hands, elbows, knees, etc. and it's very easy to make!!

Ingredients:
  • 13 oz. jar of petroleum jelly
  • 8 oz. jar of vitamin E skin cream
  • 15 oz. bottle of baby lotion
Method
Combine all ingredients in a large mixing bowl. Using an electric hand mixer on medium speed, beat ingredients until well blended and creamy. Spoon moisturizing cream into a large zip-loc bag and seal the top. Line up jars, (I bought mine at Hobby Lobby), and pipe moisturizing cream into jars by cutting a hole in one corner of the zip-loc bag and squeezing mixture into the jars. Gently tap base of jars on countertop to "settle" the contents. Close jars and decorate as desired.

The photo shown at the top of this post is the jar I gave to my mom with her Mother's Day gifts. Here's a picture of the top of that jar where I attached a ribbon flower to make it look pretty:


Click HERE for the tutorial on how to create ribbon flowers.

Next is a photo of one of the jars that I decorated and filled with moisturizing cream to add to the gift baskets that I made for the other secretaries in my department for Secretary's Day:


I apply the cream to my feet twice a day...once in the evening and then again in the morning. For really dry feet you can apply a heavier layer of moisturizing cream at night and then cover your tootsies with socks for more absorption.

Have a wonderful day!
Photobucket

Sunday, May 8, 2011

Quote Sunday

"It is at our mother's knee that we acquire our noblest and truest and highest ideals".  ~ Mark Twain

Happy Mother's Day!!

Photobucket

Saturday, May 7, 2011

Just Trying to Catch Up...

So sorry that I've been MIA this week! UGH - it's been one of those weeks where I've felt like I just couldn't keep up with anything...work, laundry, household chores, yard work, cooking, family stuff, crafting, etc., etc. And, therefore, blogging went completely by the wayside. I had good intentions of sitting down at the computer to share some fun and crafty ideas, (really I did!), but every day just slipped away from me and by the time I collapsed in my easy chair each evening I was just too pooped to post! (Or even read and comment on other blogs, for that matter). So, with that said, here I sit at midnight, unable to sleep and confessing that even though I am a high-energy kinda gal and normally very good with managing my time and juggling multiple things, for whatever reason I failed at it miserably this week!

What I actually had on the agenda to share with you this past week were project tutorials for the items that I made for the gifts baskets that I gave to the secretaries in my department to celebrate "Secretary's Day". I am very fortunate to work with 7 other secretaries in my department - Angie, Stacey, Marilyn, Penny, Kristin, Cynde and Margaret. They are all just SUPER gals and DEAR friends who make going to work each day a joy! Here's a photo of the gift baskets that I made for them:


Here's a close-up of one of the gift baskets:


The whole project was inspired by these cute little baskets that I found on clearance at Hobby Lobby last fall, marked down to only .60 cents each! I scooped them up and my crafty mental wheels started turning as to how I would decorate and fill them for Secretary's Day...


I went with a color scheme of pink, lime green, black and white. I started out by making pink bows accented with black checked ribbons to decorate the baskets with. I attached the ribbons to the basket using Liquid Glass from CTMH:


I then made little coordinating tags, wrote a note to each of the girls, and attached them to the baskets:


I lined each basket with pink tissue paper and white crinkle-paper shred. I then filled each basket with a little cello bag of M&M Chex Mix, a mock sour cream-style containter filled with mini chocolate bars, a mini composition notebook that I altered to look like a monogrammed purse, and a bottle of home-made moisturizing cream - which, by the way, is the "hot-diggedy bomb" and works absolute miracles on dry, cracked feet!! (My friend Sherri L. shared the moisturizing cream recipe with me and I'm going to share it with you in a few days as the "Recipe of the Week". After all, who says that a "Recipe of the Week" always has to be something you can eat?!?!?) Anyhoo, here are a few snapshots of the gifts I made...I'll be sharing step-by-step tutorials with you next week for these fun little projects:


Be sure to check my blog next week for the instructions to make all the goodies in the gift baskets!

Wishing you a fun and safe Mother's Day weekend!!

Photobucket

Sunday, May 1, 2011

Quote Sunday


"There is no more lovely, friendly and charming relationship, communion or company than a good marriage". ~Author Unknown
Photobucket